

Fujifilm X-T1 and Fujinon XF 60mm f/2.4 R Macro Lens – 1/1900 @ f/2.8 – ISO 200

Fujifilm X-T1 and Fujinon XF 60mm f/2.4 R Macro Lens – 1/950 @ f/2.8 – ISO 200
Fujifilm X-T1 and Fujinon XF 60mm f/2.4 R Macro Lens – 1/1900 @ f/2.8 – ISO 200
Fujifilm X-T1 and Fujinon XF 60mm f/2.4 R Macro Lens – 1/950 @ f/2.8 – ISO 200
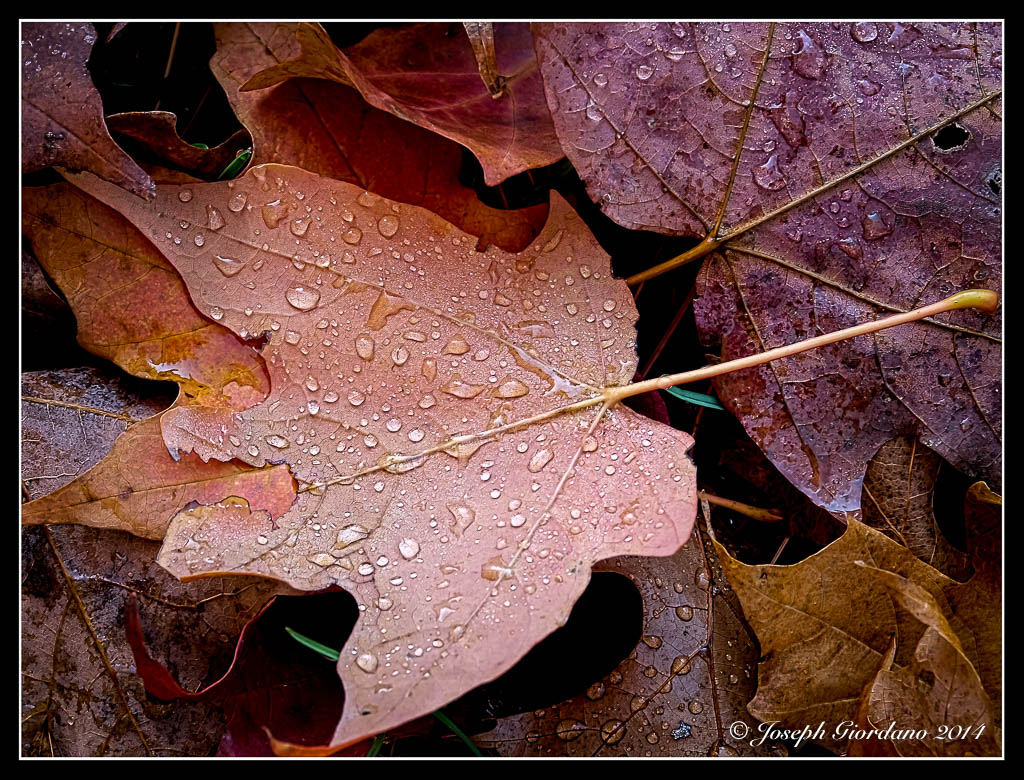
Fujifilm X-T1 and Fujinon XF 55-200 OIS R Lens – 1/20 @ f/8.0 – 110mm – ISO 200

Fujifilm X-T1 and Fujinon XF 23mm f/1.4 R Lens – 1/950 @ f/1.4 – 200mm – ISO 200
First I would like to say this post is purely my opinion so please don’t think I am singling out any particular manufacturer or promoting one system over another. I am giving my reasons for switching and my thoughts are probably out of sync with the majority of readers so as I said in last weeks post “to each their own”.
Well I finally took the plunge into the mirrorless camera world wholeheartedly yesterday. I had been building a Fujifilm system along side of my Nikon System for about a year now and I had found myself using the Nikon less and less, sorry about that West :)
I already was using a Fujifilm X-T1 so when the opportunity arose to get another X-T1, Vertical battery grip, 56mm f/1.2, 23mm f/1.4, Fuji Flash and a handful of Fuji batteries and other goodies I jumped at it. I’m sure you are saying “Oh No Joe” you must have spent a small fortune on that gear. Actually I swapped my Nikon gear for the Fuji gear (except for some items which I will sell separately) so it didn’t cost me a penny. Now I am not the first person to jump ship from a DSLR to the mirrorless world but at least I have had the opportunity to use the Fuji gear side by side with the Nikon gear to sway my final decision.
Why in the world would you do a silly thing like that Joe ?
To me it the glass (lenses) is a very important aspect in deciding which system to go with. It also has a lot to do with the camera controls but more on that later. You see way back when I was an eager young buck I remember deriving great joy from going out for a days worth of shooting with prime lenses on my Canon F-1 film camera. I had a lot of those marvelous Canon FD prime lenses and all of them were fast. I don’t remember having any lens that was slower than f/2.0. I did not own a single zoom lens. My images were really good with those fast lenses and then Canon had to go and upset the whole apple cart by changing the design of their lens mount.
You might be saying to yourself “I don’t remember Canon changing their lens mount Joe” but they did. They had to change the mount design to one that would accommodate the newer cameras that were beginning to appear with electronics.
Those great Canon lenses were called breech-lock lenses and they were machined so well that all you would have to do was face the camera lens mount up and line up the dots and the lenses would practically mount themselves. All you would have to do is twist the breech-lock ring about 1/3 of a turn and your lens was securely mounted. There was no twisting of the lens against the camera body. The only thing that moved was the breech-lock ring so there was no lens mount wear or wobbly lenses. Yes those were the good old days.
So when Canon changed their mount I traded in all my gear for Nikon. One of the great things that Nikon had been able to do is retain their original mount design so not to alienate users who had accumulated years worth of lenses. Every Nikon F mount lens will fit every Nikon SLR camera no matter how old it is. The older lenses might not meter on the newer cameras but they will fit. Why Nikon was able to build upon their original mount design to accommodate electronics and Canon did not is beyond my scope, but to say the very least I was pissed. So for the next 35 years I built a Nikon system.
The time seemed to fly by and every couple of years when Nikon announced a new camera I was at the local camera shop checking it out, and most of the time buying it. Each new generation of Nikon added more and more features, so many in fact that I was sure I never use all of them. I noticed a strange thing that happened along the way though (and I am strictly talking about myself here). The more features that were added to the cameras the less I would enjoy using them. Either you would have to twist a wheel in front of the camera to change the aperture, or hold a button while twisting a wheel to adjust exposure compensation. Some features were only accessible by diving into the menu system.
Thats great, something else I have to remember. Besides getting the correct exposure and composing my shot I had to remember dials, wheels, buttons and menus. Don’t get me wrong, having a bunch of features is great but I just didn’t feel right to me the way these features were implemented. I fully embrace technology when its enjoyable. I’m not an analog man in a digital world.
OMG look at all those glorious dials :)
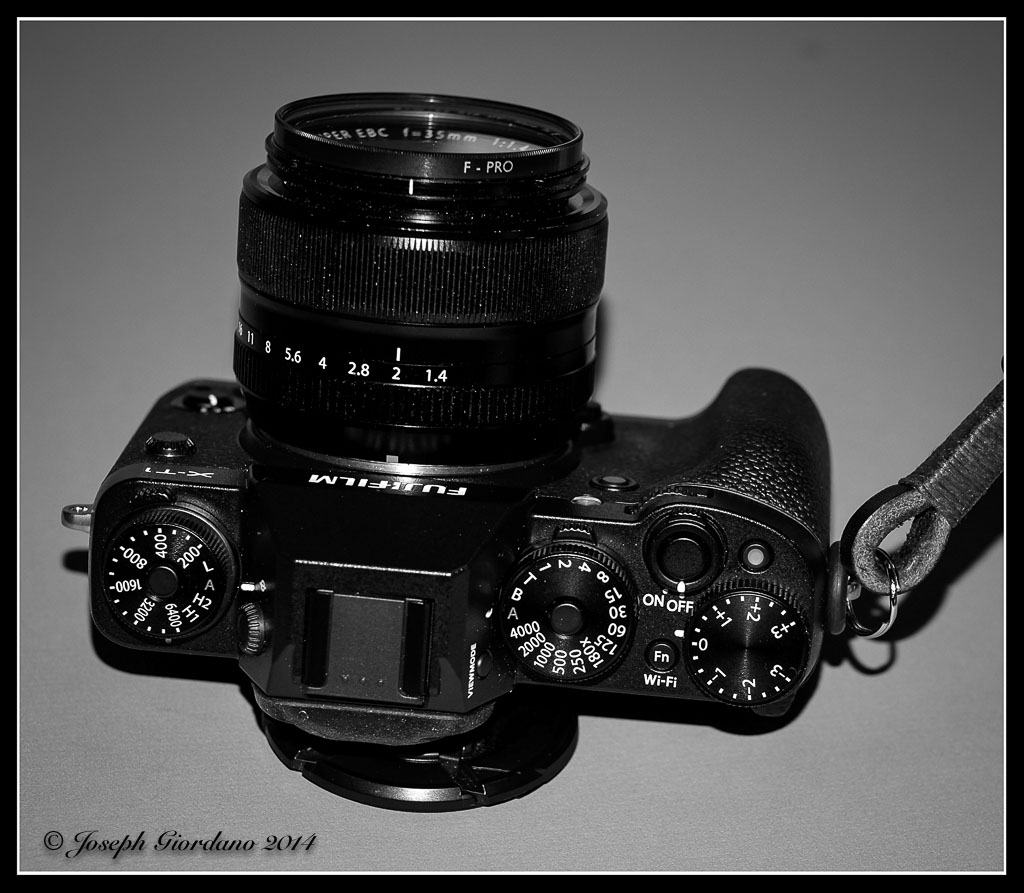
I guess I’m just old school, I like aperture rings on the lenses and knobs to twist with numbers on them. This is one of the reasons I started to like the Fuji cameras more and more. Besides having some of the best APS-C sensors in the business they have dials for shutter speeds, ISO, and exposure compensation. They have aperture rings on the lenses where some of us think they should be on every make of camera. I like the way the Fuji X-Trans sensor reproduces color and B&W, and I do believe it has something to to with the non-traditional layout of the sensor (it is not a Bayer type layout). I also liked the fact that Fuji has eliminated the AA filters on the sensor (anti-aliasing). I know other manufacturers have removed these filters also but not at this price point. Across the entire Fuji line these filters are gone so the sharpness of the images is more to my liking. Originally before jumping ship I was hoping when Nikon announced the df camera I would love it but, to me the Fuji X-T1 has better ergonomics.
The Fuji glass is also impressive. They have a complete lineup of fast prime lenses and the only zoom I have felt a need to buy is the 55-200 Optically Stabilized lens (yes Gale VR or OS lenses do work). Almost all of the lenses are tack sharp also. I enjoy using the fast lenses a lot, it reminds me of my days with my Canon F-1. The fact that the X-T1 has dials instead of wheels (it has wheels but you can choose not to use them) is just icing on the cake for me.
I was also very impressed with the quiet operation of the camera. If you turn the beep off you can hardly hear the shutter. There is no mirror slap as on a DSLR when you press the shutter, so I can use slower shutter speeds with a mirrorless and get sharper slightly images. There is no optical pentaprism to add weight to the camera. There is an electronic viewfinder and it is a superb one. I could look in the viewfinder and adjust the exposure compensation wheel and see in real time what the image will turn out like without removing my eye from the viewfinder and looking at the rear screen.
When doing time or long exposures with a DSLR you have to cover the eyepiece or it will affect your images. There is no need to cover the eyepiece on a mirrorless.
Over the years I have used and owned a lot of Canon and Nikon glass and I have really never had any complaints with the sharpness of the images. I do find that most of the Fuji glass has a “bite” to it for lack of a better word (looks a bit sharper). As far as the Canon and Nikon bodies go I have never had any major issues almost all of them were totally reliable (my Nikon D200 had over 190,000 shutter actuations) on the original shutter and was still going strong. I want to be very clear that I have nothing against these big manufacturers. The Fuji system just fits my slower deliberate style of photography better.
Just because the Fuji system fits me does not mean everyone will like it. Some reviews I have read indicate that Fuji’s are not beginners cameras or are “Quirky” but I don’t find that the case at all. For anyone looking into upgrading or buying a DSLR camera I suggest you take a look at mirrorless along with DSLR’s. There are a lot of mirrorless brands such as Sony, Fuji, Olympus and Panasonic Lumix (Olympus and Panasonic are micro 4/3 sensors which are smaller than APS-C sensors) that offer considerable bang for the buck. Mirrorless technology is rapidly maturing and when image quality is compared to DSLR’s it is almost indistinguishable.
I’m sure in time I will find some disadvantages to mirrrorless also but the way I see it the advantages will far outweigh the disadvantages.
Here is a video clip that Patti K. sent me in a comment (Patti is one of our Main Contributors on Monochromia). This is a pro that decided to go mirrorless and a lot of the reasons I switched were similar. I hope you enjoy the clip and thank you to Patti for sending it – Why I moved to mirrorless

Fujifilm X-T1 and Fujinon XF 55-200 OIS R Lens – 1/450 @ f/4.8 – 200mm – ISO 200

Fujifilm X-T1 and Fujinon XF 23mm f/1.4 R Lens – 1/3000 @ f/2.5 – ISO 200

Fujifilm X-T1 and Fujinon XF 55-200 OIS R Lens – 1/240 @ f/5.6 – 200mm – ISO 200

Fujifilm X-T1 and Fujinon XF 55-200 OIS R Lens – 1/800 @ f/4.8 – 200mm – ISO 200
Today I would like to discuss some of the various photo editing programs available to post process your images. I will also give you my views on Macintosh versus Microsoft Windows systems. Please note I am not advocating or endorsing one type of computer OS over the other I am merely stating my experience with both. Todays post was actually inspired by a question from Gale in Florida about post processing.
Lets discuss computers first because I want to be brief on this subject. I personally prefer the Macintosh OS over Windows (and this is coming from a person who owned a computer business for ten years building generic computers running Microsoft Windows). Like I said I am not endorsing I am merely stating my preferences. I find the Macintosh systems seem to require less system resources than Windows systems while running the same programs.
Huh ?
Okay let me give you an example. I sometimes will edit images on my Macbook Air computer which only has 4 GB of RAM without issue. Of course I would prefer to edit images on my Mac Mini with 16 GB of ram and a big screen but sometimes I would rather just sit on the couch with my wife and edit images on my Macbook. If I were using a Windows based system with the same processing power and 4 GB of RAM, running Adobe Lightroom 5 would be frustrating for me. In my experience the Mac programs seem to load faster than the Windows counterparts and take up less hard drive space. Some of you might say RAM is pretty cheap these days so why not just add some memory and use the Windows systems. That’s wonderful if Windows is your preference but when comparing apples to apples (no pun intended) the Mac system will load programs faster with the same processing power and memory, and I am confident saying that. The other thing I prefer about the Mac system is all of the Apple software such as word processing, spreadsheet and presentation is free and will import Microsoft Word or Excel files. The OS (operating system) upgrades are also free so I don’t have to spend money when the next generation of software is available. If I wanted to start processing RAW files immediately iPhoto is already on the Mac so if I didn’t have the extra cash to spend on Adobe Lightroom at the time I could still shoot RAW images with my camera and post process them. These are some of the reasons the Mac system is a better fit for me. As I stated previously I am not endorsing or suggesting one system over another, I am just stating which works better for me, and why I prefer it.
Okay so lets get to the meat of the post, image editing programs now that I started the controversy about computers above.
When you buy a camera most of the time it will come with a CD that has their own brand of image editing software. These proprietary programs are used if you shoot RAW images because for some stupid reason every camera manufacturer has their own RAW files. With Nikon the files have an .NEF extension, with Olympus they end in .ORF.
Why these files are different is beyond my scope of understanding but it would just make a little more sense to me if all these manufacturers would get together and standardize a file format for RAW images. They did it with .JPG images so why not RAW.
Adobe Lightroom is in my opinion the standard for post processing images for people like me (advanced amateur). You can import just about any file format including RAW images into one program.
But Joe why would I spend money on Lightroom if my camera already came with a software CD ?
Thats a really good question Joe, I’m glad I asked me. Lets use me as an example.
I am a long time Nikon user as most of you already know. Lets say I was a loyal user of the software provided by Nikon to post process images. I took the time to learn all aspects of the Nikon software and I am so familiar with it I can process images with my eyes closed (which would be a pretty neat trick).
Now I decide to buy a Fuji camera because I heard great things about their image quality. I’m very excited when I get my new Fuji home and while I am waiting for the battery to charge I decide to load the software that came with my new camera. I eagerly await for the software to finish installing and as soon as it finished I quickly open the program.
What the hell is this ?
This is nothing like the Nikon software I am accustomed to. Oh crap this is totally different and now I have to learn a whole different program to process my Fuji RAW files.
This is the exact reason you invest in Adobe Lightroom. You take the time to learn Lightroom and it will import any brand of camera RAW files along with .JPG’s of course. You learn one program and use it for all of your post processing needs. By taking the time to learn Lightroom you streamline your post processing immediately.
Another great feature of Lightroom is Plug Ins. Practically every manufacturer of image editing programs provides Plug Ins for Lightroom. For example I use NIK software’s Silver EFEX Pro sometimes to process my black and white images. They provide a Plug In so I can run Silver EFEX from within Lightroom. I just drop down one of the menus in Lightroom choose to edit my image in Silver EFEX and when I am done it automatically exports my image to Lightroom and puts me right back to where I was before I dropped down the menu. I actually use the complete suite of NIK software programs but since Google purchased the company I find myself using a suite of programs fro onOne software called Perfect Photo Suite (which by the way is a free download). When onOne comes out with new versions of their image editing suites the make the previous versions available for free. I would imagine they do this in hopes you will love their software and upgrade to their latest version, which is not free. To me the current version is well worth the $89 they charge for it. The NIK software suite is also very nice but I just find myself using the onOne software more recently.
There are free programs available such as Google Picasa that you can use for post processing your images which is fine. I just don’t think anything can match the power and versatility of Adobe Lightroom and the Plug Ins capability is just an added bonus to me.
So I hope all of you found this post of some use and I hope I cleared up some questions that you had Gale.

Fujifilm X-T1 and Fujinon XF 60mm f/2.4 R Macro lens – 1/1200 @ f/2.8 – ISO 200

Fujifilm X-T1 and Fujinon XF 60mm f/2.4 R Macro Lens – 1/480 @ f/2.4 – ISO 200

Fujifilm X-T1 and Fujinon XF 55-200mm R OIS lens – 1/600 @ f/4.4 – 135mm – ISO 200
In this post I would like to discuss Macro photography so a brief explanation is in order to explain what exactly “Macro” is. Macro photography is different than close up photography. I am sure most of you have seen the do it all lenses advertised and some of you might even own one. You know the lenses I am talking about – 24-105mm with macro or 80-200mm with macro. Well here is a little news flash, these are multi-purpose zoom lenses with a close focusing function. They are not Macro lenses. True macro lenses are fixed focal lengths 60mm, 90mm, 105mm, 180mm, 200mm and so on. True Macro lenses (or as Nikon labels them Micro) have the ability to reproduce subjects at a 1:1 ratio.
Oh crap Joe you’re not going to start with this math again !
No don’t worry what I mean by 1:1 ratio is that Macro lenses can reproduce something life-size, if it is 1 inch square it will reproduce a life-size 1 inch square on your image with no cropping or enlargement. This is called reproduction ratio and it is listed in the specifications on all Macro lenses. If you look in the specifications on the multi purpose lenses with so called “Macro” mode you will most likely see something like 1:2, 1:4 or even 1:5 and that is why these lenses should be marketed as multi purpose zooms with close up function, not macro.
I have been using a Tamron 90mm macro lens (Nikon mount) for about a year now but if I had money to burn I would buy a macro lens in the 180mm to 200mm focal length. I happened to run across this Tamron 90mm for a great price used so I purchased it. The lens is shown below and happens to be spectacularly sharp, as all macro lenses should be.

But Joe if you already have a macro lens why would you buy a longer focal length macro lens ?
There is a simple reason, to increase my working distance from the subject. I use a full frame sensor camera so the 90mm Tamron is actually 90mm. Remember way back when we were discussing depth of field and sensor size when I explained if you use anything except a full frame sensor there is a focal length multiplication factor ? Well lets say I was using an APS-C sensor camera like the Nikon D7000. Then my Tamron 90mm would actually work out to be a 135mm (90mm x 1.5 = 135).
The closer you are to your subject the more likely it is that you are going to block the light or at least shade the light. With a longer lens you have a greater working distance and you don’t run into the problem above. The working distance on the Tamron I am using is about 3.5 inches at 1:1 reproduction. If I was using a 200mm macro lens the working distance might increase to as much as 11 inches. You also have a greater chance of not disturbing insects or butterflies on flowers if you are further away from them (not to mention getting stung by a bee).
So lets see a few examples. Today was a little chilly outside so I gathered up some leaves and brought them into the house. In the first example I will just show you a natural light image straight out of the camera.
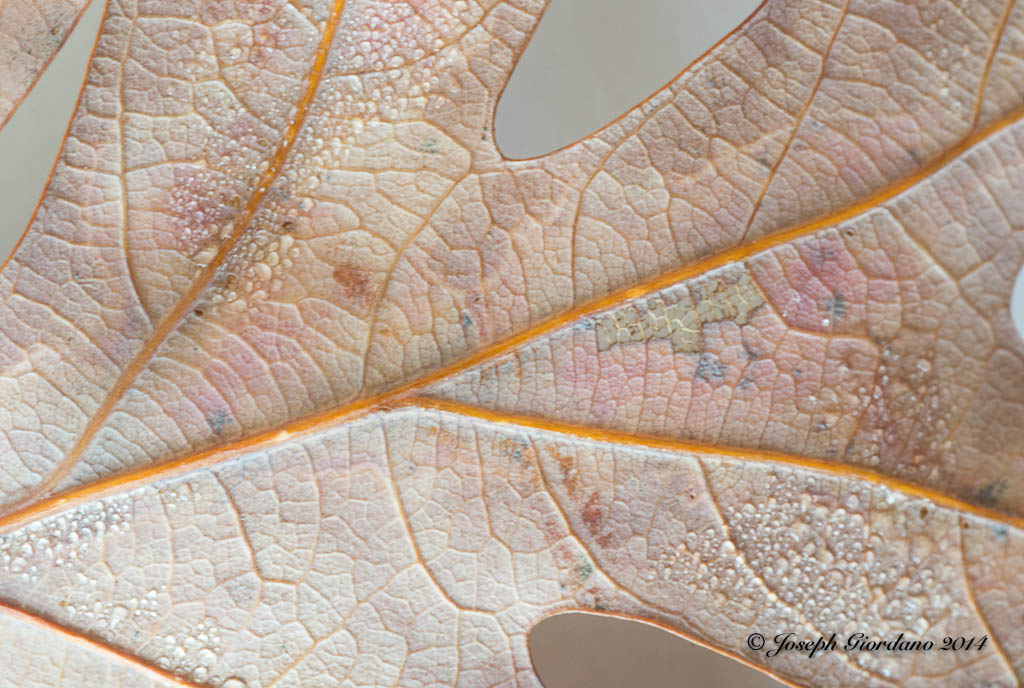
This image is a 1:1 reproduction which means the leaf was the same exact size as in the image. This image was taken at an aperture of f/32 and you would expect the depth of field to be very deep or sharp. If you look at the photo closely you will see that the veins of the oak leaf are in sharp focus but the water droplets are really not tack sharp. This particular lens goes down to f/64 but it really would not make too much difference if I used that aperture because when working with macro lenses there is no such thing as great depth of field. The difference in height between the veins and these water droplets cannot be more than 1/128 of an inch yet at f/32 the depth of field is still shallow.
Okay so lets get back to the lesson, I really don’t like the flat natural light on this image so lets try some flash in the next image.

This is a little better but the lighting is still flat because the flash was shot from a head on position (you all know me by now I’m a texture freak). Lets try a little side lighting to bring out the texture of this subject.

Do you see how much of an effect lighting can produce. On this photo the Flash was placed at the 9:00 position just to the left of the image. Lets try another light placement.
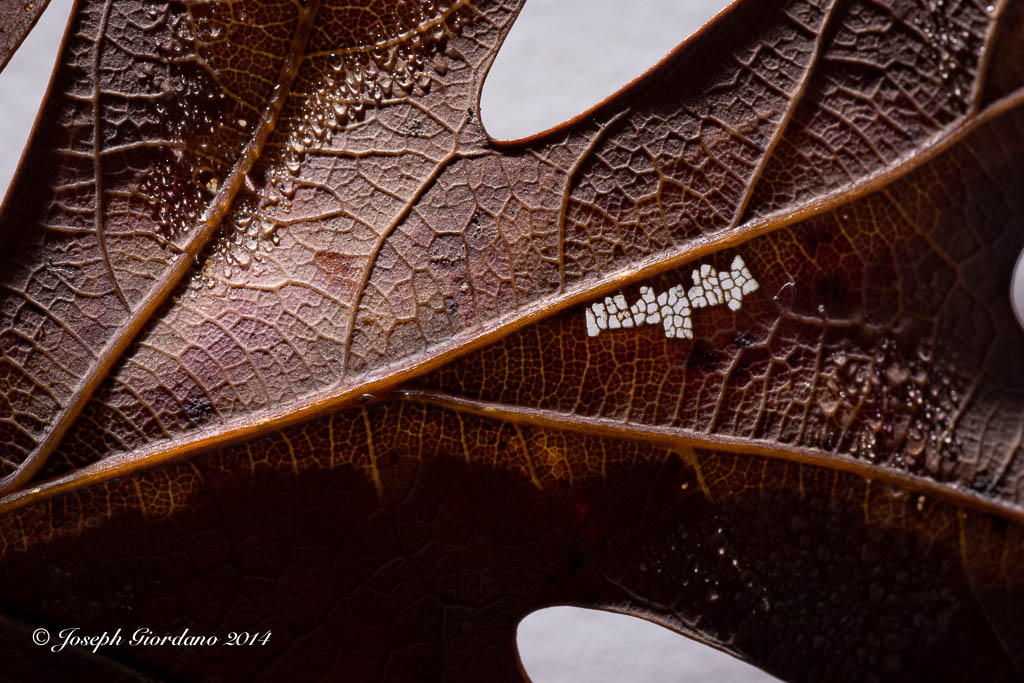
This image was taken with the flash at the 12:00 position and it also provided a little backlighting as evidenced by the white area in the middle right where the white background is showing through the leaf. Although all of these images are very different they were all taken at the same aperture f/32. It is the lighting that is making them look different. I finally settled on the image below.
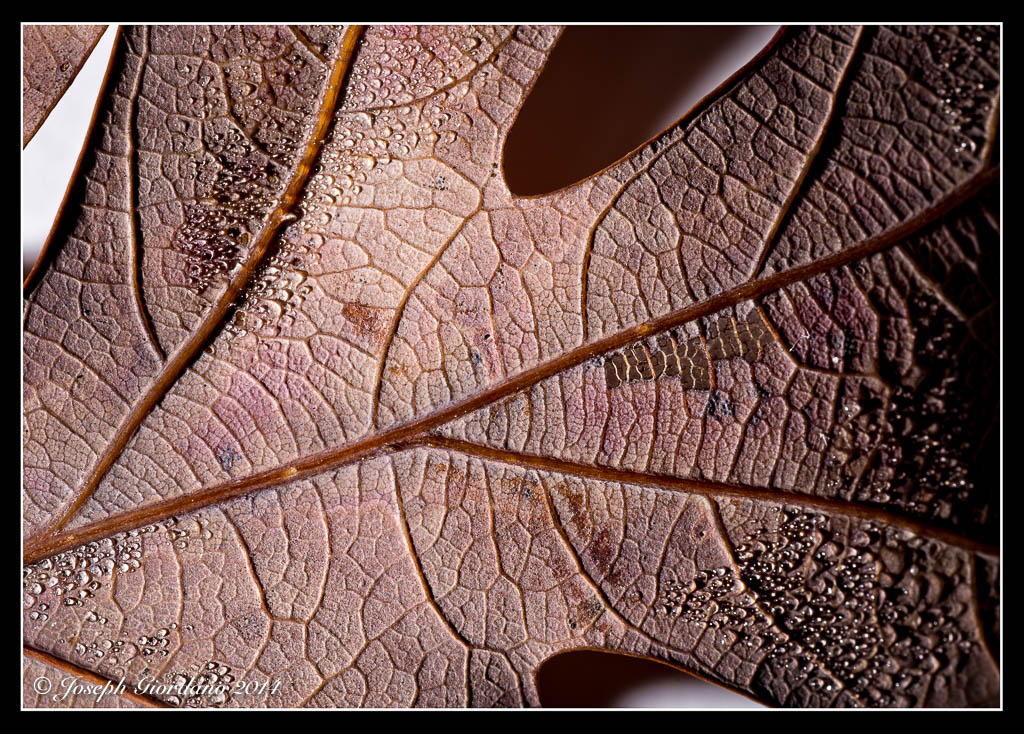
This image to my eyes was the closest to the original with only a boost in the texture which was achieved by the flash in the 7:00 position and being hand held slightly elevated.
Now some of you are probably asking yourselves why didn’t he just use the on camera flash. The reason I used an external flash is because if I used the on camera flash I would have introduced a shadow from the macro lens into the image because of the close proximity of the on camera flash and lens. I used a Nikon SB-700 Speedlight in wireless mode.
I suppose after telling you I used the SB-700 Speedlight in wireless mode I should explain. Most of the Nikon Speedlights have a mode called “Remote” and most of the Nikon cameras except for the less expensive ones have a mode called “Commander” mode. The Nikon D70, D70s, D80, D90, D200, D300, D7000, D700, D600, D610 and D800/D810 all have commander mode available in the camera. This simply means you can set your camera to control external Nikon Speedlights wirelessly with full TTL control “Through The Lens” exposure control. I’m sure Canon and other manufacturers have the same thing but you will have to check your instruction manuals to see what they call it.
Nikon also calls their system “Creative Lighting System” and here is where you find it in your menu system. I am using a Nikon D610 as an example but the menus are very similar in the cameras mentioned above.
The first menu will be shown in the Custom setting menu and it will be listed under Bracketing/flash select this.

The next menu will be Flash control for built in flash. The default setting is TTL, you will have to change it to Commander mode.
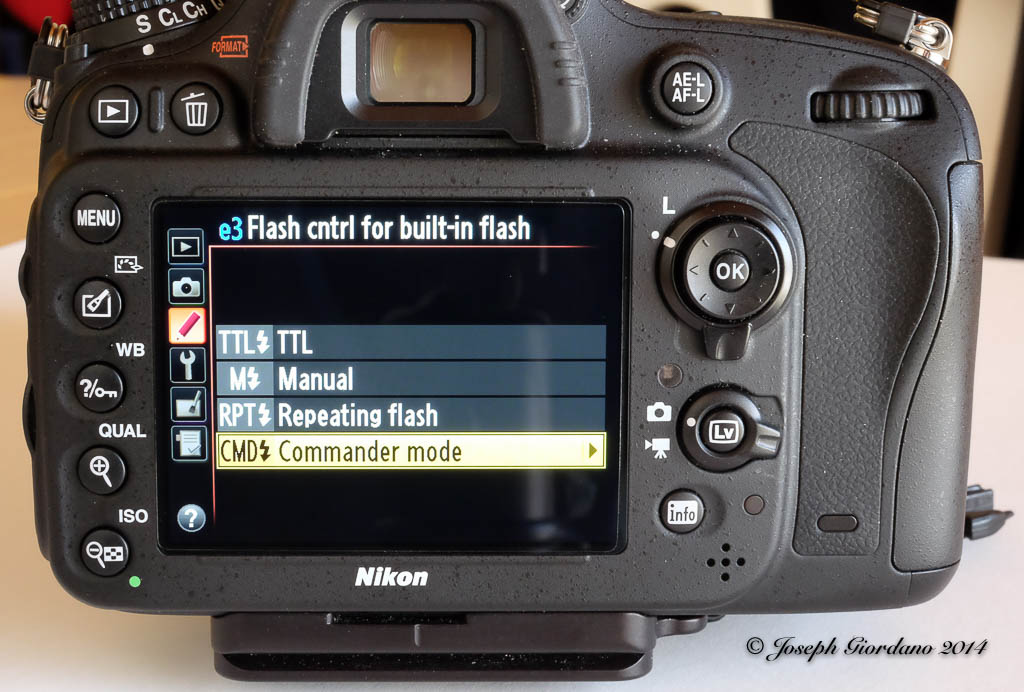
The next menu is a sub-menu of Flash control for built in flash and notice I turned the built in flash OFF as indicated by the two dashes. Being I only used one external Speedlight I am only concerned with Group A which I set to TTL with No exposure compensation and Channel 1 (yes with the Nikon CLS system you can control the output of you external Speedights from the camera position without touching your Speedlights). Also notice that you can set multiple groups of Speedlights if you desire to do a multiple light setup for portraits and the wireless function really comes in handy (if you have ever tripped over a wire and destroyed a Speedlight you will understand).
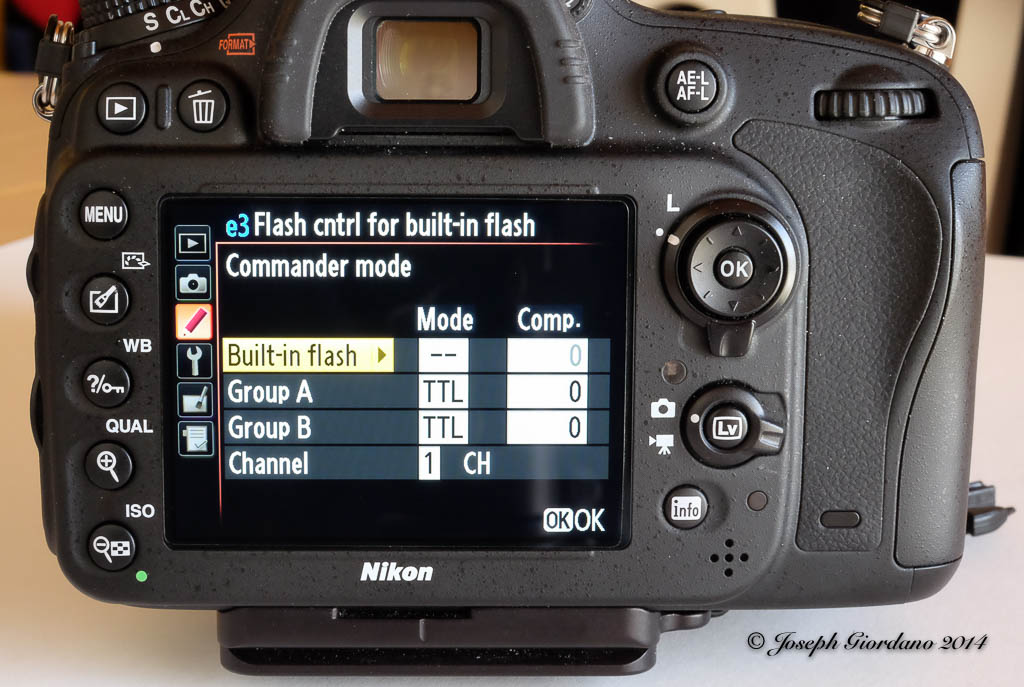
The only step left to do is set your external Speedlight to Remote and be sure to pop the built in flash on your camera up. Also make sure your external flash is set to channel 1. The built in flash will communicate with the external flash through infrared signals. It will not fire it will only control the remote.

A word to the wise is after you are done with your remote lighting session switch your menu settings back to their defaults. Your pop up flash will not fire until you do.
I hope those of you with macro lenses or about to purchase a macro lens will find this post handy and also anyone who owns one of the Nikon cameras listed above will experiment with remote wireless flash. It is simple to set up and can really improve your photos by moving the flash off camera. Hmmm maybe that should be a separate post, LOL.

Fujifilm X-T1 and Fujinon XF 55-200mm R lens – 1/850 @ f/4.8 – 200mm – ISO 200

