Joseph, Photography

You Asked For It: Photo Editing Programs

Today I would like to discuss some of the various photo editing programs available to post process your images.  I will also give you my views on Macintosh versus Microsoft Windows systems.  Please note I am not advocating or endorsing one type of computer OS over the other I am merely stating my experience with both.  Todays post was actually inspired by a question from Gale in Florida about post processing.

Why I Prefer Macintosh

Lets discuss computers first because I want to be brief on this subject. I personally prefer the Macintosh OS over Windows (and this is coming from a person who owned a computer business for ten years building generic computers running Microsoft Windows). Like I said I am not endorsing I am merely stating my preferences. I find the Macintosh systems seem to require less system resources than Windows systems while running the same programs.

Huh ?

Okay let me give you an example. I sometimes will edit images on my Macbook Air computer which only has 4 GB of RAM without issue. Of course I would prefer to edit images on my Mac Mini with 16 GB of ram and a big screen but sometimes I would rather just sit on the couch with my wife and edit images on my Macbook. If I were using a Windows based system with the same processing power and 4 GB of RAM, running Adobe Lightroom 5 would be frustrating for me. In my experience the Mac programs seem to load faster than the Windows counterparts and take up less hard drive space. Some of you might say RAM is pretty cheap these days so why not just add some memory and use the Windows systems. That’s wonderful if Windows is your preference but when comparing apples to apples (no pun intended) the Mac system will load programs faster with the same processing power and memory, and I am confident saying that. The other thing I prefer about the Mac system is all of the Apple software such as word processing, spreadsheet and presentation is free and will import Microsoft Word or Excel files. The OS (operating system) upgrades are also free so I don’t have to spend money when the next generation of software is available. If I wanted to start processing RAW files immediately iPhoto is already on the Mac so if I didn’t have the extra cash to spend on Adobe Lightroom at the time I could still shoot RAW images with my camera and post process them. These are some of the reasons the Mac system is a better fit for me. As I stated previously I am not endorsing or suggesting one system over another, I am just stating which works better for me, and why I prefer it.

Image Editing Programs

Okay so lets get to the meat of the post, image editing programs now that I started the controversy about computers above.

When you buy a camera most of the time it will come with a CD that has their own brand of image editing software. These proprietary programs are used if you shoot RAW images because for some stupid reason every camera manufacturer has their own RAW files. With Nikon the files have an .NEF extension, with Olympus they end in .ORF.

Why these files are different is beyond my scope of understanding but it would just make a little more sense to me if all these manufacturers would get together and standardize a file format for RAW images. They did it with .JPG images so why not RAW.

Adobe Lightroom is in my opinion the standard for post processing images for people like me (advanced amateur).   You can import just about any file format including RAW images into one program.

But Joe why would I spend money on Lightroom if my camera already came with a software CD ?

Thats a really good question Joe, I’m glad I asked me. Lets use me as an example.

I am a long time Nikon user as most of you already know. Lets say I was a loyal user of the software provided by Nikon to post process images. I took the time to learn all aspects of the Nikon software and I am so familiar with it I can process images with my eyes closed (which would be a pretty neat trick).

Now I decide to buy a Fuji camera because I heard great things about their image quality. I’m very excited when I get my new Fuji home and while I am waiting for the battery to charge I decide to load the software that came with my new camera. I eagerly await for the software to finish installing and as soon as it finished I quickly open the program.

What the hell is this ?

This is nothing like the Nikon software I am accustomed to. Oh crap this is totally different and now I have to learn a whole different program to process my Fuji RAW files.

This is the exact reason you invest in Adobe Lightroom. You take the time to learn Lightroom and it will import any brand of camera RAW files along with .JPG’s of course. You learn one program and use it for all of your post processing needs. By taking the time to learn Lightroom you streamline your post processing immediately.

Another great feature of Lightroom is Plug Ins. Practically every manufacturer of image editing programs provides Plug Ins for Lightroom. For example I use NIK software’s Silver EFEX Pro sometimes to process my black and white images. They provide a Plug In so I can run Silver EFEX from within Lightroom. I just drop down one of the menus in Lightroom choose to edit my image in Silver EFEX and when I am done it automatically exports my image to Lightroom and puts me right back to where I was before I dropped down the menu. I actually use the complete suite of NIK software programs but since Google purchased the company I find myself using a suite of programs fro onOne software called Perfect Photo Suite (which by the way is a free download). When onOne comes out with new versions of their image editing suites the make the previous versions available for free. I would imagine they do this in hopes you will love their software and upgrade to their latest version, which is not free. To me the current version is well worth the $89 they charge for it. The NIK software suite is also very nice but I just find myself using the onOne software more recently.

There are free programs available such as Google Picasa that you can use for post processing your images which is fine. I just don’t think anything can match the power and versatility of Adobe Lightroom and the Plug Ins capability is just an added bonus to me.

So I hope all of you found this post of some use and I hope I cleared up some questions that you had Gale.

Standard
Photography

You Asked For It – Exposure And Metering

This is the fourth installment of the “You Asked For It” series of posts and I will try to explain exposure and the different kinds of metering options most modern cameras have. I will also explain hand held light meters and ISO.

Why should I worry about the different metering modes available, my camera seems to do a decent job automatically ?

This is a great question and I’m really glad I asked myself !

The different modes of metering are available because there are situations where the standard default metering will not do an effective job of obtaining correct exposure. I think an explanation of the type of metering is in order before I go any further.

two-meter-types

Reflected Light Metering

Reflected light metering is the method used by all modern cameras today. You point the camera at your subject and your camera measures the light reflecting back to the camera off the subject.  The only problem with this method is when light is reflected back to the camera it does not take into account whether the subject is light or dark in tone.  Sophisticated cameras do their best at compensating for this effect and sometimes they will do a decent job.  Most reflected light meters are calibrated for middle gray or 18% gray.

So why do I need to know this useless information ?

When taking color photos we do not have too many problems with reflected light meters.   Black and white photography is where we might run into problems.   Remember when I told you most reflected light meters are calibrated for 18% or middle gray ?   What do you think will happen if you are taking a black and white photo of a white dinner plate ?   You guessed it the camera will most likely reproduce the image not white but middle gray.   Some metering systems in todays cameras are sophisticated enough to recognize this and will compensate for it, others will not.   Back in the film days  the “Zone” system was created for exactly this reason. The zone system was formulated by Ansel Adams and Fred Archer in the 1930’s.   If you do research on the “Zone” system you will find that 18% gray would equal Zone V (5).   OK enough talk about the Zone system because we are going off on a tangent but there is plenty of information on the internet if you want to learn more about it.  Here is a great article on this subject – Explanation of The Zone System

By the way in case you didn’t realize by now most cameras don’t meter in color.  They have color sensors to record the scene but most of the time the metering sensor  is seeing shades of gray (and I’m not talking about the book ladies)  🙂

Incident Light Metering

Incident metering reads the intensity of light falling on the subject, so it provides readings that will create accurate and consistent rendition of the subject’s tonality, color, and contrasts regardless of reflectance, background color, brightness, or subject textures.  Lets read that last sentence again carefully because this is where these metering methods differ.  The first part of the sentence states Incident metering reads the intensity of light falling on the subject.   Notice it does not rely on the light reflected back to the camera.  Why is this so important ?   The next part of the sentence explains this.  It provides readings that will create accurate and consistent renditions of the subjects tonality, color and contrasts regardless of reflectance, background color, brightness, or subject textures.

Whaaaat ?

To use an incident meter you point it in the direction of the camera or towards the camera or by the subject.

But why would I do a stupid thing like that ?

By doing this we can assume that the amount of light falling on the Incident Light meter is the same amount of light that would be falling on the subject.  This method usually works very well for landscape photography and most portrait photographers also use this method.  I happen to use this type of metering when I don’t trust the internal meter on the camera.

I am by no means suggesting that all of you go out and buy Incident light meters because they are superior.  I am just trying to explain the differences and why in certain situations you might have to compensate or adjust exposure from what your in camera meter is suggesting.

In Camera Metering Modes

Most of todays cameras even consumer level DSLR’s have a few different kinds of metering modes available for the user to choose from.  Notice I said modes not types because all internal metering types are reflective type.  I am familiar with Nikon and Fuji but I will use the Nikon terminology.

Matrix Metering or evaluative metering .  This type of metering scheme divides the scene into multiple segments and evaluates each segment for brightness, it then compares these readings to an internal database of possible exposure solutions, then chooses the presumed correct exposure.  The majority of times the exposure is very accurate and this mode of metering should be the default choice for the majority of photos.

Spot Metering is typically used in high contrast situations.   This type of meter concentrates all of its sensitivity on a central spot for precise metering.  For example lets say you attended a concert where the performer is brightly lit but the rest of the stage is dark.  Using Matrix metering would probably result in the wrong exposure because it evaluates multiple areas of the scene and would most likely result in a dark image.   You would use spot metering because you would just want to meter the brightly lit performer to insure he or she was exposed correctly.  Spot metering could also be used for backlit situations where you would be taking a photo of someone with their back to the sun and their face in the shade, you would just meter their face with the central spot.

Center Weighted Metering would be used for scenes that are fairly even in brightness. This type of metering would concentrate most of its sensitivity on the central to bottom portion of the scene, but would not be anywhere near as concentrated as the spot metering mode.  It could also come in handy for sunsets where you would want to create silhouettes of a pier or a boat on the water.  Most film SLR’s used this type of metering years ago.

Please go out and experiment with the different modes of metering on your camera to become familiar with their characteristics.  Put your camera in aperture priority automatic and use the same aperture but take three photos of the same scene (for consistency).  Use Evaluative metering for one shot, Spot metering for the next and Center Weighted metering for the final shot.  When you upload your images to the computer see if you can tell the difference between the three images and why each one is different.

You don’t waste time by experimenting you gain a better idea of what is happening and why.   We are talking digital so there is no need to think you are wasting film.

Sensitivity

I think an explanation of sensitivity is in order by now (don’t worry guys I’m not going to get all emotional on you now).  Sensitivity is expressed in ISO and it is adjustable on all cameras.  Years ago in the film days this sensitivity was expressed in ASA and in later years ISO.  The lower the sensitivity on the film was, the less reactive to light it was.  Kodak made a film named Panatomic-X and this film had a ASA of 25.  They also made a named Plus-X which was 100 ASA (this film was 4 times as sensitive to light as the Panatomic-X was).  Kodak also made a film named Tri-X which was 400 ASA (or again 4 times as sensitive to light as Plus-X).  As the speed of the film increased so did the size film grain.

Let me explain, if you wanted to go out and take photos at the beach or a bright sunny day you would probably use the Panatomic-X at 25 ASA.  You would not need the higher film speed because you had ample light.  If you were going to a concert or a stage performance you would want a film such as Tri-X that was more sensitive to light because of the more dimly lit situation.

ISO works the same as ASA worked on film cameras.  The lower the ISO is set the less sensitive your camera’s digital sensor is to light and of course the higher the ISO the more sensitive to light.  Being we are not using film we don’t have to worry about film grain when we increase the ISO.  We do have to worry about digital noise though which is similar to film grain.  The higher you set the ISO the noiser the image will be.

But Joe even if I put my ear really close to the camera I still don’t hear any noise ?

Digital noise is nothing you can hear but you can easily see it in your images, they are less sharp and the colors are muted.  If you use your camera in Program Automatic mode the ISO will most likely be set automatically to something higher than you should be using.  The best thing you can do is set your camera to the lowest ISO or (default ISO which is most likely 100 or 200 ISO) and leave it there.  Some cameras have very good high ISO performance but they are the higher end models and not the starter or beginner cameras.  Take your cameras out of Program mode and go through your menus and turn off auto ISO unless you have a high end model.  If you want to see how high ISO can degrade the image quality do the following experiment.  Set your camera to ISO 200 and go outside and take a photo of an object in the shade.  Then change your ISO to 6400 or the highest it will go and take the same photo of the object in the shade.  Compare the two on a computer and let me know which photo you like better.

I know this installment of the lessons is not as easy to understand as the previous three posts. This is why I saved it until today, so I could lure you into being interested in these posts, Moo Ha Ha !   It was not intended to teach you how you should take photos but more to inform you why your camera has different metering modes and when you should use them.    If you have any questions please contact me and I will answer to the best of my ability.

Standard
Photography

You Asked For It – Shutter Speed

This is the third installment of the “You Asked For It” series and we will discuss Shutter Speed today. Shutter speed is one method which controls the amount of light that reaches the film or digital sensor.

Oh no, their’s more than one method ?

Yup ! Last week we discussed aperture or lens opening which is the other way we control the amount of light reaching the film or digital sensor.

OK, now you’re full of it Joe, you wrote a whole damn article on depth of field and you had me believing that ?

Aperture does control depth of field, but it also is another way to control the amount light that reaches the film or digital sensor.

Remember last week when I told you I didn’t want you to worry about how aperture is related to shutter speed and formulas ?

Guess what, I lied 🙂

We have to understand the relationship between aperture and shutter speed to be able to control light in manual mode.

SeeSaw

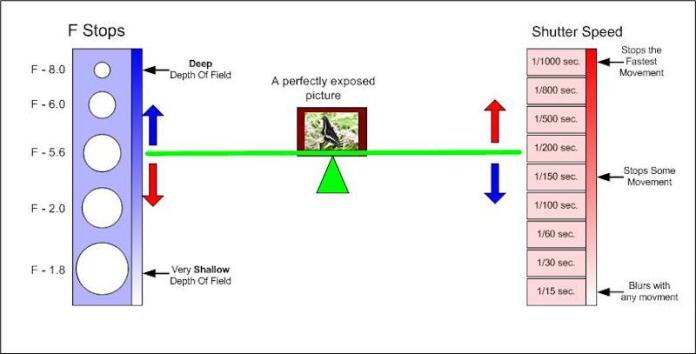
The above chart will show in graphic form how aperture and shutter speed are linked.   You will see as the aperture is increased (lower number) shutter speed must increase.  Think of this graphic as a child’s SeeSaw with the pivot point in the middle indicating the perfect exposure and it will become clear how aperture and shutter speed are linked.

Why is this ?

When we increase the aperture or open the lens (lower number) we are letting more light into the camera.  By doing this we have to also increase the shutter speed so the shutter stays open for a shorter time or else we would overexpose the image.  If we were to use the opposite example by closing the aperture (higher number) we  are letting less light into the camera so the shutter speed must be decreased so the shutter speed would stay open for a longer period of time to compensate for the lower light.

To prove the above chart is accurate i would like you to take your camera and put it into Aperture Priority mode (remember when we are in aperture priority mode we are controlling the aperture and the camera is selecting the shutter speed).  Point the camera towards a brightly illuminated window or go outside if you prefer and change the aperture from its lowest number to the highest number.   I want you to take notice to how the shutter speed is reacting as you change the aperture.  Open the aperture and the shutter speed gets higher, close the aperture the shutter speed gets lower.

OK Joe but I thought this lesson was about shutter speed, and I’m still playing around with the aperture ?

Good point, now lets put the camera into Shutter Priority mode.

Can anyone tell me what happens when we put the camera into this mode ?  A show of hands please !

Yes you in the back with your hand raised really high Pauline, you are absolutely correct we are choosing the shutter speed and the camera is automatically selecting the corresponding aperture to achieve the correct exposure.

Why on earth do I need to know this ?

Lets say you wanted to take a photo of a fast moving object such as a train or an automobile. You really would not be too concerned with depth of field you would be more concerned with how to capture this object so it is clear.  To do this you would have to freeze motion.

How do we freeze motion and am I going to be cold during this lesson ?

I am talking about freezing motion by using a higher shutter speed not by temperature 🙂   By choosing a higher shutter speed (higher number) we are keeping the shutter open for a shorter period of time.

Whaaat ?

If you notice shutter speeds are expressed in fraction form 1/8000, 1/4000, 1/2000,1/1000, 1/500, 1/250, 1/125 and so on.

Do you notice a pattern with these numbers ?

Very good Elina, they all look like they are exactly half of each other.  For example 1/1000th of a second is half of 1/500th of a second.  We can also state this as 1/1000th of a second will let exactly half the amount of light into the camera as 1/500th of a second, or expressed in photography terms 1 stop faster.  If we reversed this 1/500th of a second will let exactly twice the amount of light into the camera as 1/1000th of a second or 1 stop slower.

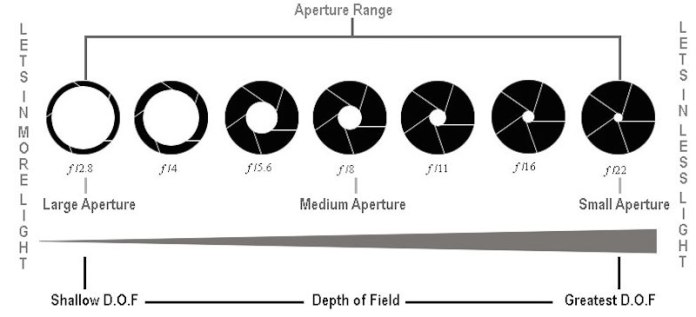
You might have noticed in the previous lesson on Depth Of Field the lens opening or aperture is expressed in numbers also.  Lets show that chart again.

camera-aperture

Do you notice any similarities with the numbers on this chart ?  f/4 looks like it’s letting half the light into the camera as f/2.8, and f/5.6 looks like its letting half the light into the camera as f/4. These are called f stops and f/4 is one stop slower than f/2.8 or we could also say that f/4 is letting exactly half the light into the camera as f/2.8.  As we look at the chart we will see that as we close the aperture or increase the number (higher) each f stop or f number lets in exactly half the light as the previous f stop.

OK so now that we know the camera aperture and shutter speeds are calibrated in stops we could make sense of why aperture and shutter speed are linked.

Lets say we point the camera at an any object and the meter on the camera is reading 1/125th of a second at f/8 for proper exposure.  Now lets say that object is a person and we want to isolate this person from the background by using shallow depth of field.  Well the camera is reading  f/8 so I am not going to be able to isolate the background with that aperture so I want to open the aperture to f/2.8 to get the pleasing background.  I cannot just change the aperture and expect not to compensate with the shutter speed and still achieve proper exposure so lets count backwards.  As I change from f/8 to f/5.6 (one stop increase) I am letting twice the amount of light into the camera so I would have to increase the shutter speed by one stop from 1/125th of a second to 1/250th of a second (one stop decrease).

Why are you saying decrease when the shutter speed is getting higher ?

Because as we increase the shutter speed from 1/125 to 1/250 we are letting half the light into the camera to compensate for the increase of twice the light by opening up the aperture from f/8 to f/5.6.  Starting to make sense ?

Lets continue to count backwards because I want to open the aperture to f/2.8 to photograph this person.   Now lets open the lens to f/4 or 1 more stop so once again we are letting twice the amount of light in so we have to increase the shutter speed to 1/500th to compensate or 1 stop less.  Lets continue and change the aperture to f/2.8 or 1 stop more and once again we are letting twice the amount of light into the camera so we compensate by increasing the shutter speed to 1/1000th one stop less.   We now have the aperture where we want to have a pleasing background and we are still getting correct exposure.  In other words 1/125th @ f/8 is the same exposure as 1/1000th @ f/2.8 all we did was adjust the camera from its suggested exposure to properly fit the situation of taking a photo of someone where we wanted to have a pleasing out of focus background.  I showed you an example of a camera in manual mode, if your camera was in aperture priority mode the shutter speed would change automatically as you changed the aperture.

Shutter Speed

First I am going to show you the difference between a photo taken with a slow shutter speed and then I will show you one taken at a faster speed. The photo on the top was taken with a shutter speed of 1/13th of a second. This was done intentionally to convey speed or motion. This technique is known as motion blur and even though the bicyclists and car are really not moving that fast using a slow shutter speed exaggerates their motion.

OLYMPUS DIGITAL CAMERA

This performer was in the Quincy Market Square in Boston and was using a giant Pogo stick. He was about 5 to 6 feet in mid-air as the interested crowd looks on.  Notice how using a shutter speed of only 1/200th of a second almost totally froze him in mid-air.  If I would have had the light to increase the shutter speed to lets say 1/500th of a second this photo would have been totally sharp. This is known as freezing motion.

Stunt


As you become more familiar with aperture and shutter speed and practice using different settings you will begin to understand why some of you photos are turning out great and why some not so great.  When you understand these concepts you will be able to identify settings or mistakes you might of relied on the camera to take care of before and correct them on the spot so you don’t miss the shot.  I know this lesson was a little more difficult than the previous ones but as we progress the lessons will get more complex.  I am trying to make these lessons as easy to understand as I can but if you do not understand something please email me through the contact me page.

Next Friday – Metering and Exposure

Standard
Photography

You Asked For It – Depth Of Field

This is the second post in the “You Asked For It” series and today I will discuss depth of field.  What is depth of field and why should I care ?

Depth of field is the ability to isolate your subject from the background – shallow depth of field

Depth of field is also the ability to have everything from close to infinity in sharp focus – greater depth of field.

Whaaat ?  How could the definition of depth of field mean two different things ?

Before I explain here are a few things to keep in mind:

1.   The smaller the sensor on your camera the more difficult it will be to achieve shallow depth of field.  This simply means if you have a compact point and shoot camera it will be very hard to take photographs with a shallow depth of field.  The lenses on these cameras are simply not fast enough (the aperture does not open wide enough).  There are of course some exceptions one being the Fujifilm X10 and X20 cameras which have very fast zoom lenses.

2.    The wider the field of view (or the shorter the focal length) of the lens the more difficult it will be to achieve shallow depth of field (wide angle).  The narrower the field of view (or the longer the focal length) the easier it will be to achieve shallow depth of field (telephoto).

3.    Most kit lenses on DSLR cameras are not fast enough to achieve shallow depth of field.   Now before everyone reading gets mad at me let me explain.  Most of the time when you go out and buy a camera kit you are paying 80% of the price for the camera body and 20% for the lens.  What does this mean ?  The manufacturer is basically throwing in the lens to sweeten the deal and keep the price of the camera reasonable.  Most of these kit cameras sold on the market today are also equipped with APS-C size sensors which are smaller than full frame sensors on professional cameras.  There is nothing wrong with APS-C size sensors and they could be used for professional looking results but remember what I mentioned in the first comment (the smaller the sensor the more difficult it will be to achieve shallow depth of field).

Anyway lets get back to the lenses.  Most kit lenses supplied with cameras will be 18-55mm f/3.5-f/5.6 which simply means at 18mm the widest aperture you can use will be f/3.5 and it will slowly decrease as you zoom out to 55mm where the widest aperture available will be f/5.6.   These are called sliding aperture lenses and are usually used on consumer level cameras.   Professional level lenses will usually be fixed aperture lenses such as a 24-70mm f/2.8 lens.   On this type of lens the widest aperture available will be f/2.8 throughout the entire zoom range which is a big difference from a kit lens.  These lenses also carry a much higher price because they are more expensive to manufacture.  There are some aftermarket fixed aperture zoom lenses available at reasonable prices such as the Tamron 17-50mm f/2.8 which also happens to be an excellent lens.

4.    Full frame sensor cameras will be the easiest cameras to achieve shallow depth of field with.  What is a full frame sensor ?  The original format for a SLR camera (single lens reflex) was 35mm and that described the size of film it used which was approximately 36 x 24mm in size.   When we say full frame DSLR (digital single lens reflex) we are referring to the size of the digital sensor which is approximately the size of a frame of 35mm film.

camera-aperture

As you can see in the diagram above your lens opening or aperture varies depending on what is required for correct exposure.  The lens opening works in conjunction with the shutter speed on the camera.   When your camera is in Program mode the camera decides the correct exposure by selecting a combination of shutter speed and aperture.  In Program mode your camera decides everything so you have no control.  The first thing you should do to be able to control depth of field is put your camera in Aperture Priority mode.  By setting your camera to Aperture Priority mode you will control the lens opening or aperture and the camera will select the correct shutter speed to obtain correct exposure.  Notice we are taking baby steps here and still working with a safety net.  Your camera is still making decisions just not all of them.   Now you will be able to control depth of field by selecting the lens opening of your choice.  The first test I want you to do is to take a photo of a picket fence with a fully open aperture, then take the same photo with the aperture fully closed.  Take the two photos from the position of standing right next to the fence and the pickets are moving away from you.

Go ahead I’ll wait I’m retired 🙂   Now I want you to upload these images to your computer and compare them and see if you can tell the difference in depth of field.  Which one was taken with the wide open aperture and which was taken with the fully closed aperture.  Are you starting to understand the concept of depth of field ?

Shallow Depth Of Field

So why do I care about shallow depth of field I want all my photos to be totally sharp ?

OK if thats what you want you should close this article and move onto the next photo in the WordPress reader.   But if I took the time to read this far into this post I would stick it out until the end.  Sometimes we want to separate our subject from the background such as in a portrait.  If you are taking a photo of someone standing in front of a Rhododendron that was blooming you would not want the flowers to be tack sharp because that would detract from your subject.  You want your subject to be tack sharp and the flowers to be less sharp or blurred.  That would be an example of shallow depth of field.

How do we achieve this ?

By using a wide lens opening or a lower number (f-stop or aperture).  A typical outdoor portrait with a pleasing background (soft focus) should be taken at an aperture of less than f/3.5 or a lower number.  This is where the problem of the kit lens comes in because most of them do not go lower that f/3.5.

Everyone who is serious about photography should purchase a 50mm f/1.8 lens or if your budget is a little more generous an f/1.4.  Most manufacturers offer a 50mm f/1.8 lens for under $200 and the optics on a lenses such as these will probably be loads better than a kit lens.

Yes but if I buy a 50mm I will lose the zoom function ?

Well my answer to that would be use your feet to zoom, move back from the subject if you want a wider view or closer if you want a tighter view.  Most people that buy 50mm lenses tend to use them a lot more than their kit zooms because of the increase in picture quality.

The photo below illustrates shallow depth of field where the fingertips of the gloves are in sharp focus but the background quicky falls off into a blur (a large lens opening or lower aperture number).  This photo was taken with a Fuji X100s and the lens opening was f/2.0 the widest available on that camera.

CoffeeBreak

Greater Depth Of Field

So far all I have been talking about is shallow depth of field.  So why would I want greater depth of field ?  If you are a person who likes to photograph landscapes you would want everything from near to far to be in focus.  How would you do this ?  By using a smaller lens opening or a higher number (f-stop or aperture).  You can also achieve this effect by using a wider angle lens which inherently have greater depth of field.

The photo below illustrates greater depth of field where everything from the rocks in the foreground to the bridge all the way in the distance is in sharp focus (a small lens opening or higher aperture number).  This photo was taken with a Nikon D7000 and Tokina 12-24mm lens at f/8.0 which is about the middle of the aperture range for that lens.  Be careful when using  f-numbers or apertures smaller than f/8 or f/11 because an effect called diffraction will degrade your image quality (a whole different subject).

IceRock

Now for all of you with kit lenses out there whom I just alienated I apologize.  There is still hope, just remember a wider lens opening will give you a shallow depth of field (a lower f-number), and a smaller lens opening (higher f-number) will give you a greater depth of field.    Go out and experiment with your camera and kit lens.

The reason I told you to put your camera in  aperture priority mode earlier in this post is because I didn’t fully explain aperture and how it relates to shutter speed.  I would rather you not get confused with formulas when you are still trying to grasp the concept of depth of field.

Don’t worry by the end of these  lessons we will take your safety net away and turn you loose with your cameras in fully manual mode 🙂

The quicker you take your camera out of program mode or fully automatic mode the quicker you will take your images to the next level.

Next Friday we will explain – Shutter Speed

Standard