
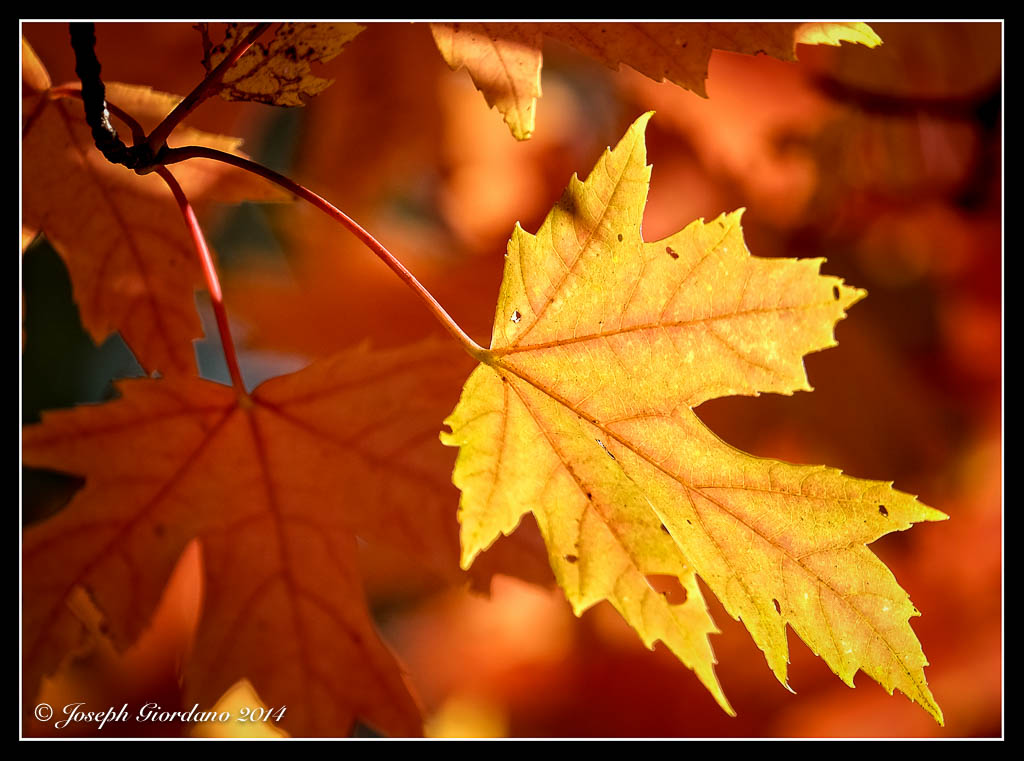
Fujifilm X-T1 and Fujinon XF 55-200 OIS R Lens – 1/450 @ f/4.8 – 200mm – ISO 200
Fujifilm X-T1 and Fujinon XF 23mm f/1.4 R Lens – 1/3000 @ f/2.5 – ISO 200
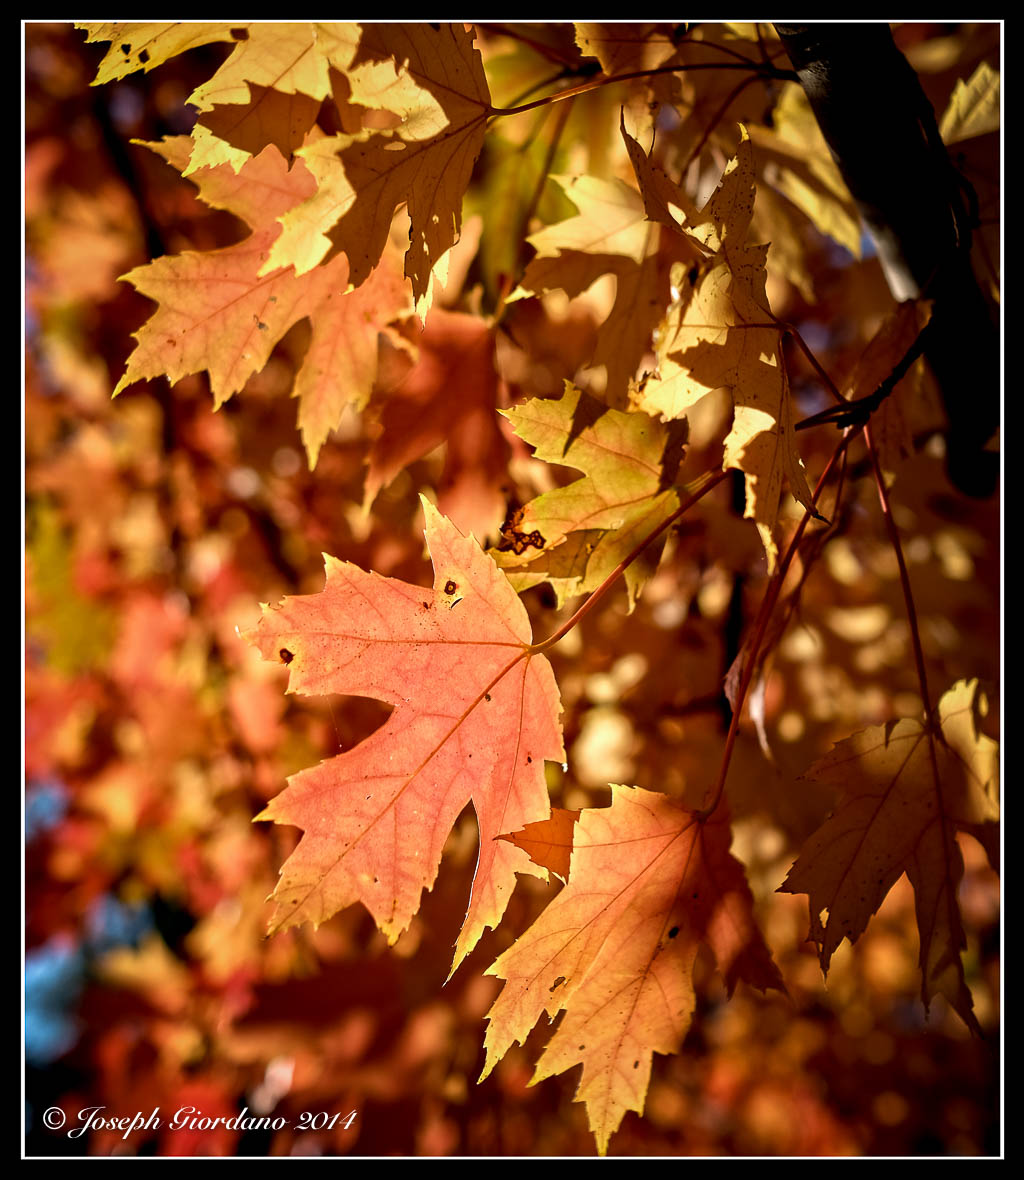
Fujifilm X-T1 and Fujinon XF 55-200 OIS R Lens – 1/450 @ f/4.8 – 200mm – ISO 200
Fujifilm X-T1 and Fujinon XF 23mm f/1.4 R Lens – 1/3000 @ f/2.5 – ISO 200

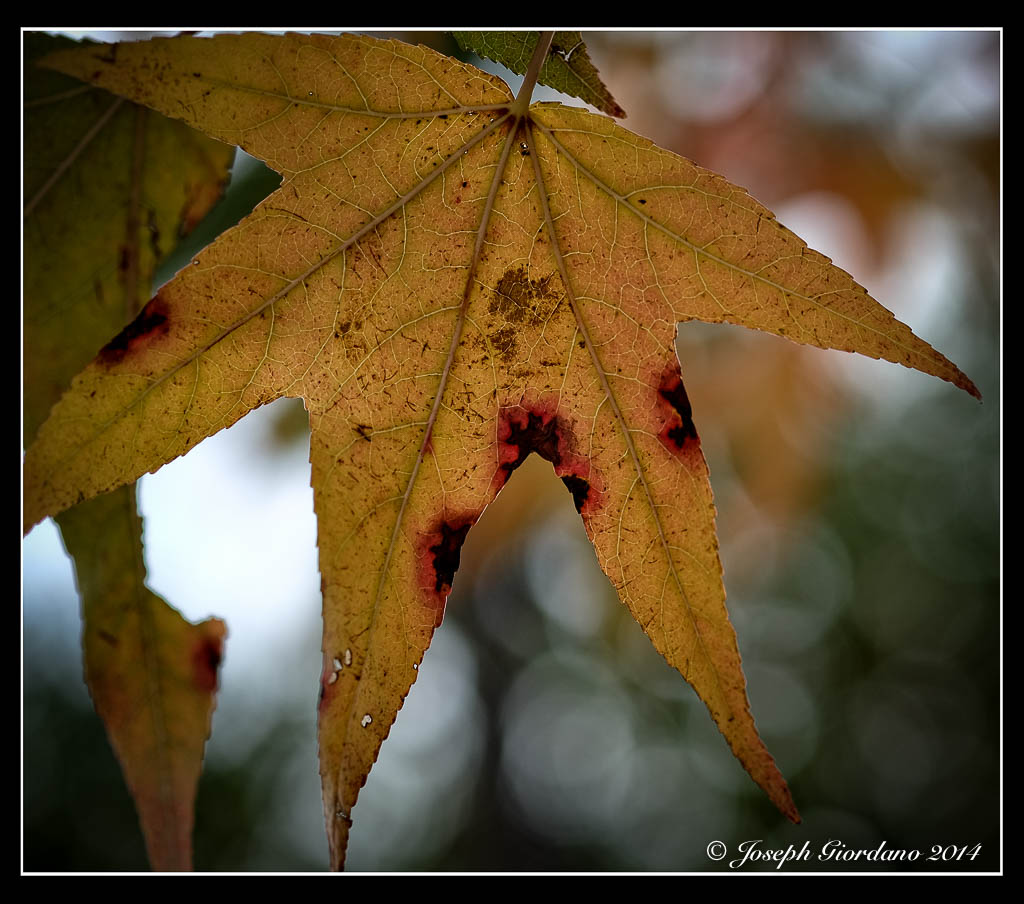
Fujifilm X-T1 and Fujinon XF 55-200 OIS R Lens – 1/240 @ f/5.6 – 200mm – ISO 200

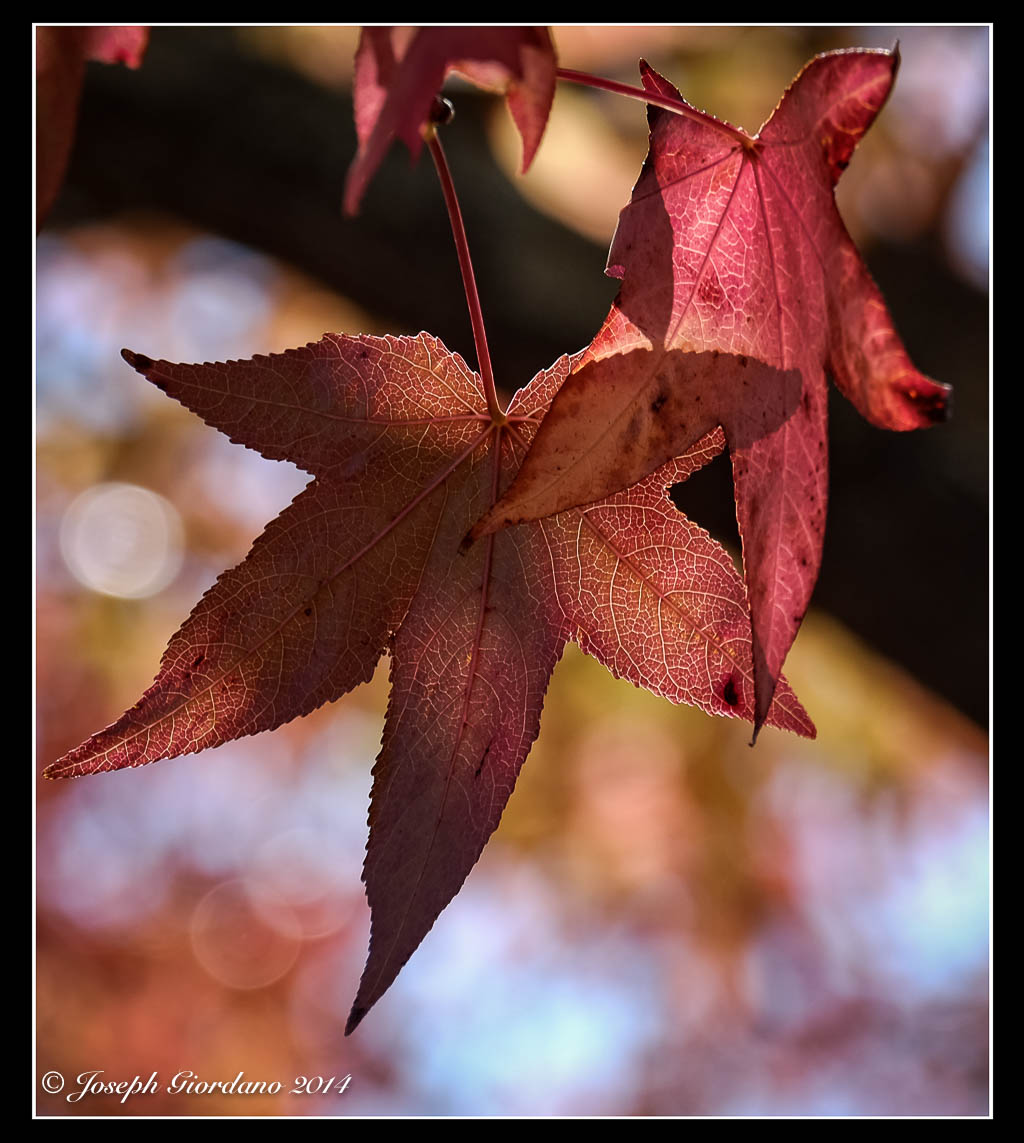
Fujifilm X-T1 and Fujinon XF 55-200 OIS R Lens – 1/800 @ f/4.8 – 200mm – ISO 200
Today I would like to discuss some of the various photo editing programs available to post process your images. I will also give you my views on Macintosh versus Microsoft Windows systems. Please note I am not advocating or endorsing one type of computer OS over the other I am merely stating my experience with both. Todays post was actually inspired by a question from Gale in Florida about post processing.
Lets discuss computers first because I want to be brief on this subject. I personally prefer the Macintosh OS over Windows (and this is coming from a person who owned a computer business for ten years building generic computers running Microsoft Windows). Like I said I am not endorsing I am merely stating my preferences. I find the Macintosh systems seem to require less system resources than Windows systems while running the same programs.
Huh ?
Okay let me give you an example. I sometimes will edit images on my Macbook Air computer which only has 4 GB of RAM without issue. Of course I would prefer to edit images on my Mac Mini with 16 GB of ram and a big screen but sometimes I would rather just sit on the couch with my wife and edit images on my Macbook. If I were using a Windows based system with the same processing power and 4 GB of RAM, running Adobe Lightroom 5 would be frustrating for me. In my experience the Mac programs seem to load faster than the Windows counterparts and take up less hard drive space. Some of you might say RAM is pretty cheap these days so why not just add some memory and use the Windows systems. That’s wonderful if Windows is your preference but when comparing apples to apples (no pun intended) the Mac system will load programs faster with the same processing power and memory, and I am confident saying that. The other thing I prefer about the Mac system is all of the Apple software such as word processing, spreadsheet and presentation is free and will import Microsoft Word or Excel files. The OS (operating system) upgrades are also free so I don’t have to spend money when the next generation of software is available. If I wanted to start processing RAW files immediately iPhoto is already on the Mac so if I didn’t have the extra cash to spend on Adobe Lightroom at the time I could still shoot RAW images with my camera and post process them. These are some of the reasons the Mac system is a better fit for me. As I stated previously I am not endorsing or suggesting one system over another, I am just stating which works better for me, and why I prefer it.
Okay so lets get to the meat of the post, image editing programs now that I started the controversy about computers above.
When you buy a camera most of the time it will come with a CD that has their own brand of image editing software. These proprietary programs are used if you shoot RAW images because for some stupid reason every camera manufacturer has their own RAW files. With Nikon the files have an .NEF extension, with Olympus they end in .ORF.
Why these files are different is beyond my scope of understanding but it would just make a little more sense to me if all these manufacturers would get together and standardize a file format for RAW images. They did it with .JPG images so why not RAW.
Adobe Lightroom is in my opinion the standard for post processing images for people like me (advanced amateur). You can import just about any file format including RAW images into one program.
But Joe why would I spend money on Lightroom if my camera already came with a software CD ?
Thats a really good question Joe, I’m glad I asked me. Lets use me as an example.
I am a long time Nikon user as most of you already know. Lets say I was a loyal user of the software provided by Nikon to post process images. I took the time to learn all aspects of the Nikon software and I am so familiar with it I can process images with my eyes closed (which would be a pretty neat trick).
Now I decide to buy a Fuji camera because I heard great things about their image quality. I’m very excited when I get my new Fuji home and while I am waiting for the battery to charge I decide to load the software that came with my new camera. I eagerly await for the software to finish installing and as soon as it finished I quickly open the program.
What the hell is this ?
This is nothing like the Nikon software I am accustomed to. Oh crap this is totally different and now I have to learn a whole different program to process my Fuji RAW files.
This is the exact reason you invest in Adobe Lightroom. You take the time to learn Lightroom and it will import any brand of camera RAW files along with .JPG’s of course. You learn one program and use it for all of your post processing needs. By taking the time to learn Lightroom you streamline your post processing immediately.
Another great feature of Lightroom is Plug Ins. Practically every manufacturer of image editing programs provides Plug Ins for Lightroom. For example I use NIK software’s Silver EFEX Pro sometimes to process my black and white images. They provide a Plug In so I can run Silver EFEX from within Lightroom. I just drop down one of the menus in Lightroom choose to edit my image in Silver EFEX and when I am done it automatically exports my image to Lightroom and puts me right back to where I was before I dropped down the menu. I actually use the complete suite of NIK software programs but since Google purchased the company I find myself using a suite of programs fro onOne software called Perfect Photo Suite (which by the way is a free download). When onOne comes out with new versions of their image editing suites the make the previous versions available for free. I would imagine they do this in hopes you will love their software and upgrade to their latest version, which is not free. To me the current version is well worth the $89 they charge for it. The NIK software suite is also very nice but I just find myself using the onOne software more recently.
There are free programs available such as Google Picasa that you can use for post processing your images which is fine. I just don’t think anything can match the power and versatility of Adobe Lightroom and the Plug Ins capability is just an added bonus to me.
So I hope all of you found this post of some use and I hope I cleared up some questions that you had Gale.
Fujifilm X-T1 and Fujinon XF 60mm f/2.4 R Macro lens – 1/1200 @ f/2.8 – ISO 200

Fujifilm X-T1 and Fujinon XF 60mm f/2.4 R Macro Lens – 1/480 @ f/2.4 – ISO 200
Fujifilm X-T1 and Fujinon XF 55-200mm R OIS lens – 1/600 @ f/4.4 – 135mm – ISO 200
In this post I would like to discuss Macro photography so a brief explanation is in order to explain what exactly “Macro” is. Macro photography is different than close up photography. I am sure most of you have seen the do it all lenses advertised and some of you might even own one. You know the lenses I am talking about – 24-105mm with macro or 80-200mm with macro. Well here is a little news flash, these are multi-purpose zoom lenses with a close focusing function. They are not Macro lenses. True macro lenses are fixed focal lengths 60mm, 90mm, 105mm, 180mm, 200mm and so on. True Macro lenses (or as Nikon labels them Micro) have the ability to reproduce subjects at a 1:1 ratio.
Oh crap Joe you’re not going to start with this math again !
No don’t worry what I mean by 1:1 ratio is that Macro lenses can reproduce something life-size, if it is 1 inch square it will reproduce a life-size 1 inch square on your image with no cropping or enlargement. This is called reproduction ratio and it is listed in the specifications on all Macro lenses. If you look in the specifications on the multi purpose lenses with so called “Macro” mode you will most likely see something like 1:2, 1:4 or even 1:5 and that is why these lenses should be marketed as multi purpose zooms with close up function, not macro.
I have been using a Tamron 90mm macro lens (Nikon mount) for about a year now but if I had money to burn I would buy a macro lens in the 180mm to 200mm focal length. I happened to run across this Tamron 90mm for a great price used so I purchased it. The lens is shown below and happens to be spectacularly sharp, as all macro lenses should be.

But Joe if you already have a macro lens why would you buy a longer focal length macro lens ?
There is a simple reason, to increase my working distance from the subject. I use a full frame sensor camera so the 90mm Tamron is actually 90mm. Remember way back when we were discussing depth of field and sensor size when I explained if you use anything except a full frame sensor there is a focal length multiplication factor ? Well lets say I was using an APS-C sensor camera like the Nikon D7000. Then my Tamron 90mm would actually work out to be a 135mm (90mm x 1.5 = 135).
The closer you are to your subject the more likely it is that you are going to block the light or at least shade the light. With a longer lens you have a greater working distance and you don’t run into the problem above. The working distance on the Tamron I am using is about 3.5 inches at 1:1 reproduction. If I was using a 200mm macro lens the working distance might increase to as much as 11 inches. You also have a greater chance of not disturbing insects or butterflies on flowers if you are further away from them (not to mention getting stung by a bee).
So lets see a few examples. Today was a little chilly outside so I gathered up some leaves and brought them into the house. In the first example I will just show you a natural light image straight out of the camera.
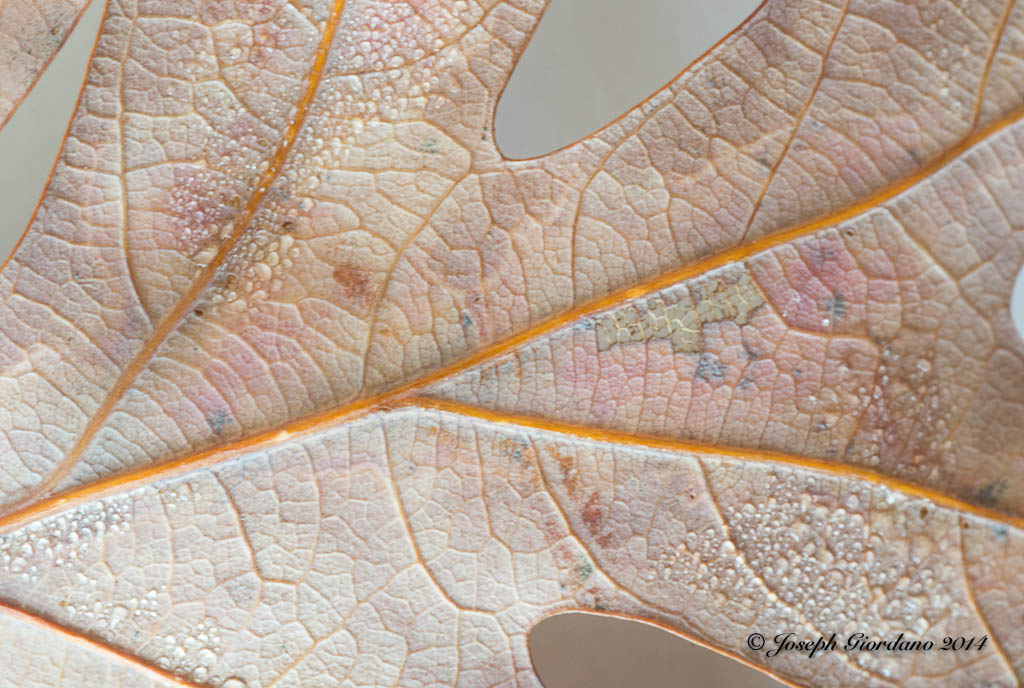
This image is a 1:1 reproduction which means the leaf was the same exact size as in the image. This image was taken at an aperture of f/32 and you would expect the depth of field to be very deep or sharp. If you look at the photo closely you will see that the veins of the oak leaf are in sharp focus but the water droplets are really not tack sharp. This particular lens goes down to f/64 but it really would not make too much difference if I used that aperture because when working with macro lenses there is no such thing as great depth of field. The difference in height between the veins and these water droplets cannot be more than 1/128 of an inch yet at f/32 the depth of field is still shallow.
Okay so lets get back to the lesson, I really don’t like the flat natural light on this image so lets try some flash in the next image.

This is a little better but the lighting is still flat because the flash was shot from a head on position (you all know me by now I’m a texture freak). Lets try a little side lighting to bring out the texture of this subject.

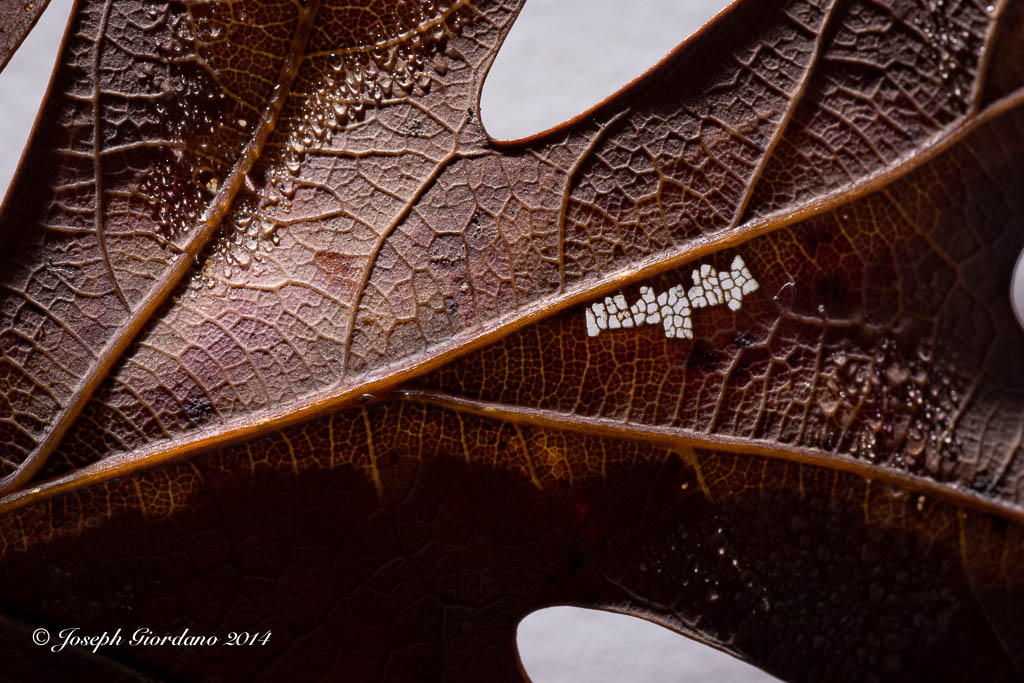
Do you see how much of an effect lighting can produce. On this photo the Flash was placed at the 9:00 position just to the left of the image. Lets try another light placement.
This image was taken with the flash at the 12:00 position and it also provided a little backlighting as evidenced by the white area in the middle right where the white background is showing through the leaf. Although all of these images are very different they were all taken at the same aperture f/32. It is the lighting that is making them look different. I finally settled on the image below.
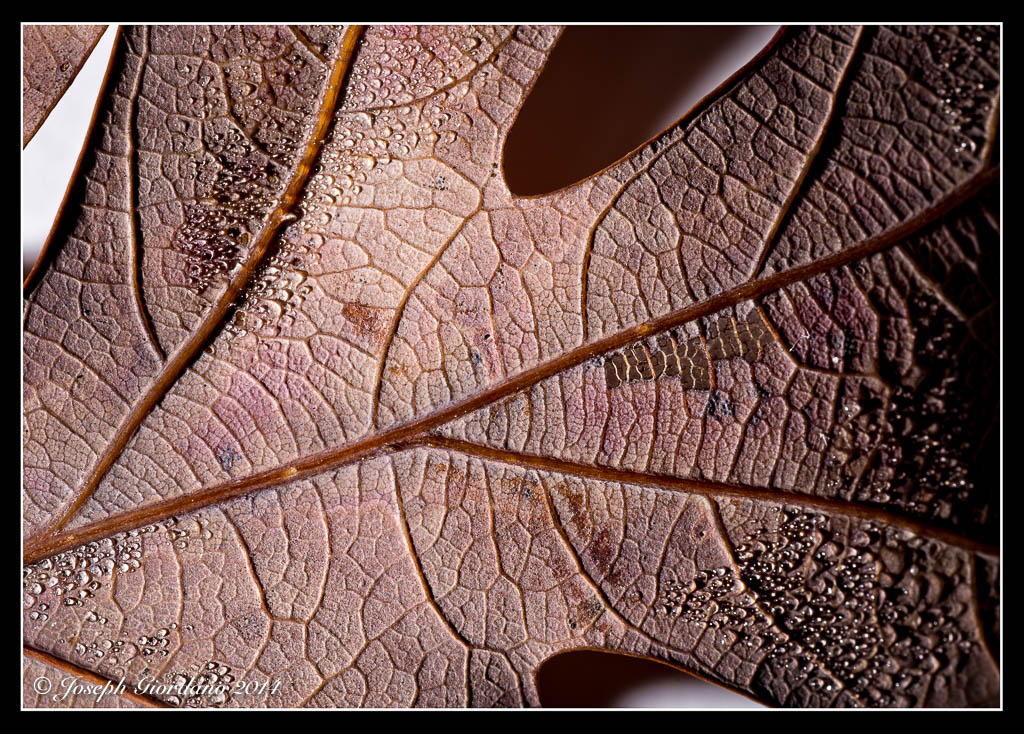
This image to my eyes was the closest to the original with only a boost in the texture which was achieved by the flash in the 7:00 position and being hand held slightly elevated.
Now some of you are probably asking yourselves why didn’t he just use the on camera flash. The reason I used an external flash is because if I used the on camera flash I would have introduced a shadow from the macro lens into the image because of the close proximity of the on camera flash and lens. I used a Nikon SB-700 Speedlight in wireless mode.
I suppose after telling you I used the SB-700 Speedlight in wireless mode I should explain. Most of the Nikon Speedlights have a mode called “Remote” and most of the Nikon cameras except for the less expensive ones have a mode called “Commander” mode. The Nikon D70, D70s, D80, D90, D200, D300, D7000, D700, D600, D610 and D800/D810 all have commander mode available in the camera. This simply means you can set your camera to control external Nikon Speedlights wirelessly with full TTL control “Through The Lens” exposure control. I’m sure Canon and other manufacturers have the same thing but you will have to check your instruction manuals to see what they call it.
Nikon also calls their system “Creative Lighting System” and here is where you find it in your menu system. I am using a Nikon D610 as an example but the menus are very similar in the cameras mentioned above.
The first menu will be shown in the Custom setting menu and it will be listed under Bracketing/flash select this.

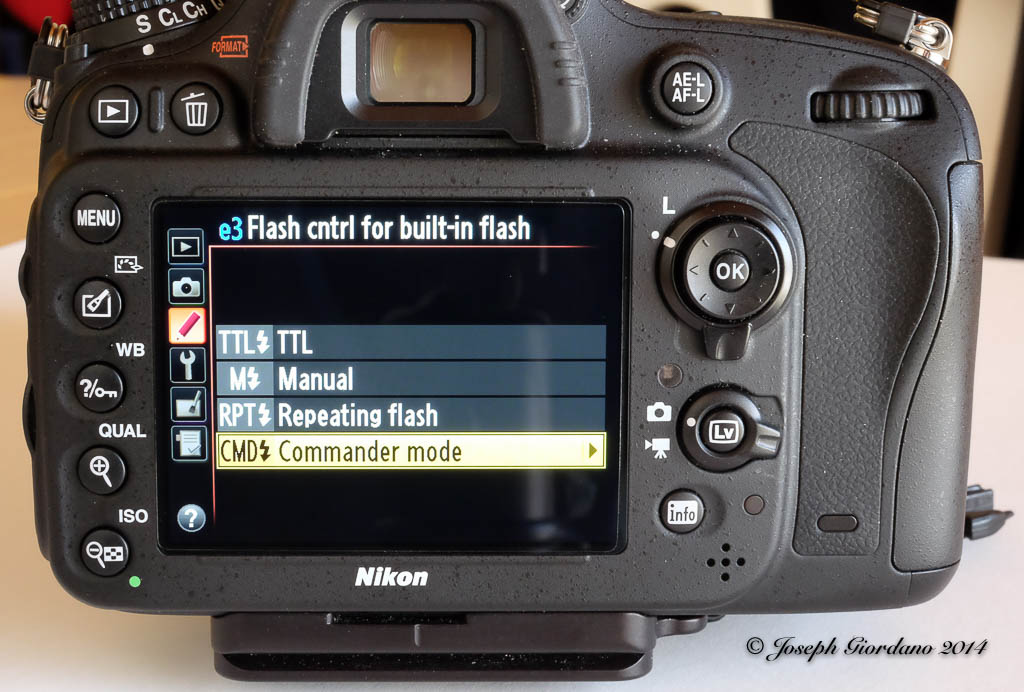
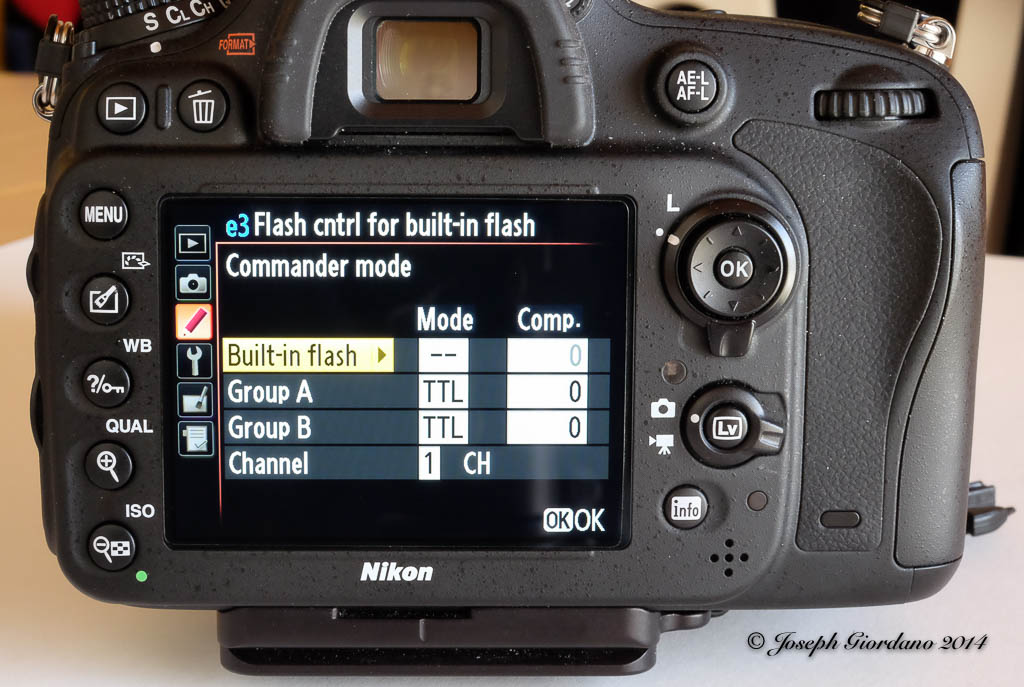
The next menu will be Flash control for built in flash. The default setting is TTL, you will have to change it to Commander mode.
The next menu is a sub-menu of Flash control for built in flash and notice I turned the built in flash OFF as indicated by the two dashes. Being I only used one external Speedlight I am only concerned with Group A which I set to TTL with No exposure compensation and Channel 1 (yes with the Nikon CLS system you can control the output of you external Speedights from the camera position without touching your Speedlights). Also notice that you can set multiple groups of Speedlights if you desire to do a multiple light setup for portraits and the wireless function really comes in handy (if you have ever tripped over a wire and destroyed a Speedlight you will understand).
The only step left to do is set your external Speedlight to Remote and be sure to pop the built in flash on your camera up. Also make sure your external flash is set to channel 1. The built in flash will communicate with the external flash through infrared signals. It will not fire it will only control the remote.

A word to the wise is after you are done with your remote lighting session switch your menu settings back to their defaults. Your pop up flash will not fire until you do.
I hope those of you with macro lenses or about to purchase a macro lens will find this post handy and also anyone who owns one of the Nikon cameras listed above will experiment with remote wireless flash. It is simple to set up and can really improve your photos by moving the flash off camera. Hmmm maybe that should be a separate post, LOL.

Fujifilm X-T1 and Fujinon XF 55-200mm R lens – 1/850 @ f/4.8 – 200mm – ISO 200
Before we get into this discussion of what color temperature is I should explain the Kelvin scale. Color temperature is rated in degrees k (k in lower case) on the Kelvin scale which was invented by Scottish scientist William Thompson (Lord Kelvin). I am not going to get into a discussion on how William Thompson arrived at this scale but if you are interested you can do a Google search on him and there is plenty of information available on the subject.
The color temperature scale will apply to all color photography but white balance is only adjustable in post processing if you shoot RAW.
What is color temperature ?

The chart provided above indicates that 5500 degrees k is daylight. Anything lower than 5500 degrees k will impart a yellow to red quality of light to your images and anything higher will impart a blue quality. If you remember in previous lessons I stated that I take a lot of images around “Golden Hour”. If you look at the Kelvin scale you will see that Sunrise/Sunset and Golden Hour are on the warm side of the scale and the quality of light is on the yellow to orange. The example below will verify how the quality of light (or color temperature) will correspond with the kelvin scale.

The above photo was taken right after sunrise and the color temperature is about 3300 degrees k. If you look at the Kelvin scale at 3300 k you will see what color light influenced the above image.
I know the above explanation is fairly basic but I think it is easy enough to understand just by looking at the chart.
Why should I worry about color temperature because the camera seems to do a good job adjusting it on its own ?
The camera does a very good job of adjusting white balance on its own and I suggest you leave it Auto white balance. I am suggesting that you shoot RAW rather than jpg files because if the camera is slightly off with its white balance choice at least you can correct it in post processing.
But my camera is always spot on and I never feel the need to adjust white balance Joe.
That might be true but you must be very lucky because sooner or later you will have to adjust white balance to achieve proper color. I will show you a couple of examples below and while the white balance is only slightly off it makes a big difference when working with a color calibrated monitor (as I am) and if you print your photos. Most people do not see white balance problems until they print their image and waste expensive photo paper.

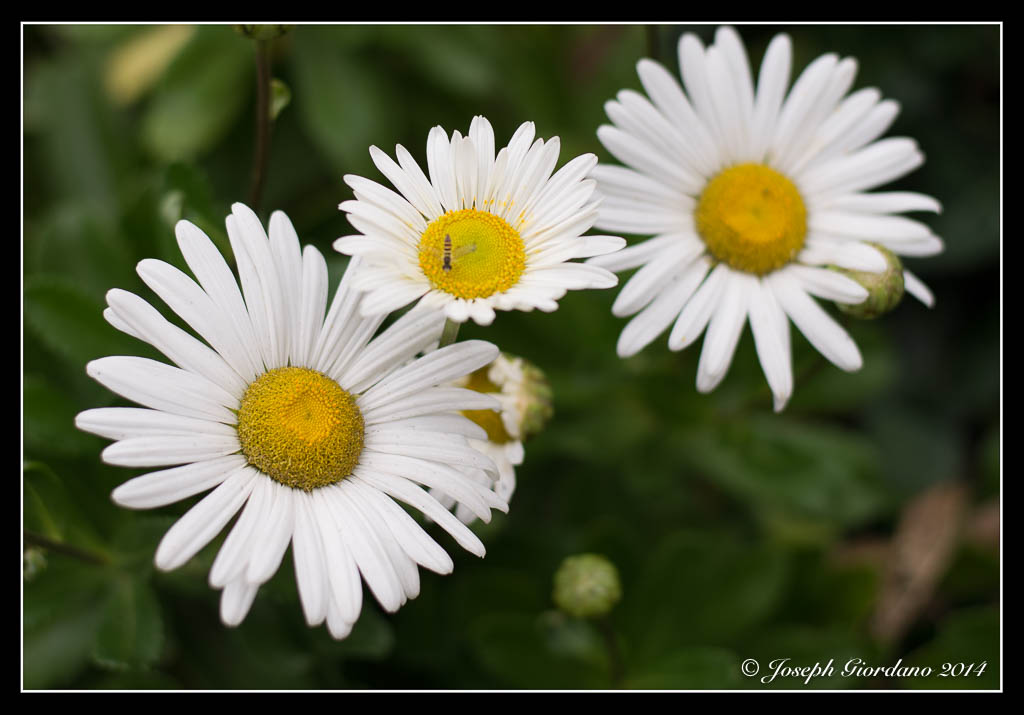
In the above example this is a pretty straight forward image of some flowers and the camera did a pretty decent job with the white balance 4750 degrees k. Upon a closer inspection you might notice the white petals take on a bluish green tint because of the light reflected off the background foliage.

In this example I corrected the white balance by raising the color temperature in Lightroom to 5100 degrees k which is more like the scene I saw with my eyes. Even though the color temperature was only raised by 350 degrees k the white petals are more correctly displayed.
In this example I changed the color temperature to daylight in Lightroom 5500 degrees k but I think its a little too much to my liking so the second example looks more correct to me. Some of you might not even notice these changes I am making because you are using a small screen or a notebook computer but I can assure you with a 27′ monitor like the size I am using the changes are plain as day.
Let me show you a different example.

This image was taken in Niagara Falls from the Canadian side and the image looks pretty good. I didn’t like the bluish tint to the spray and the water coming over the falls. This photo was taken on Auto white balance at 4950 degrees k. Lets try to correct that water in the next image.

This is a little bit better the water is closer to the original color and the spray looks whiter. The surroundings look like mid April in Ontario (when this image was taken) before the leaves started growing on the trees. This was corrected to daylight or 5500 degrees k in Lightroom.
If you shoot RAW files you should try going back into your photo archives and try to find some that might benefit from a small white balance adjustment.

Nikon D610 and 50mm AF-S G f/1.8 lens – 1/2000 @ f/4.0 – ISO 100
I was looking at this shadow of a flag when the wind picked up and I snapped this image.

