Joseph, Photography

You Asked For It – Focal Length And Perspective

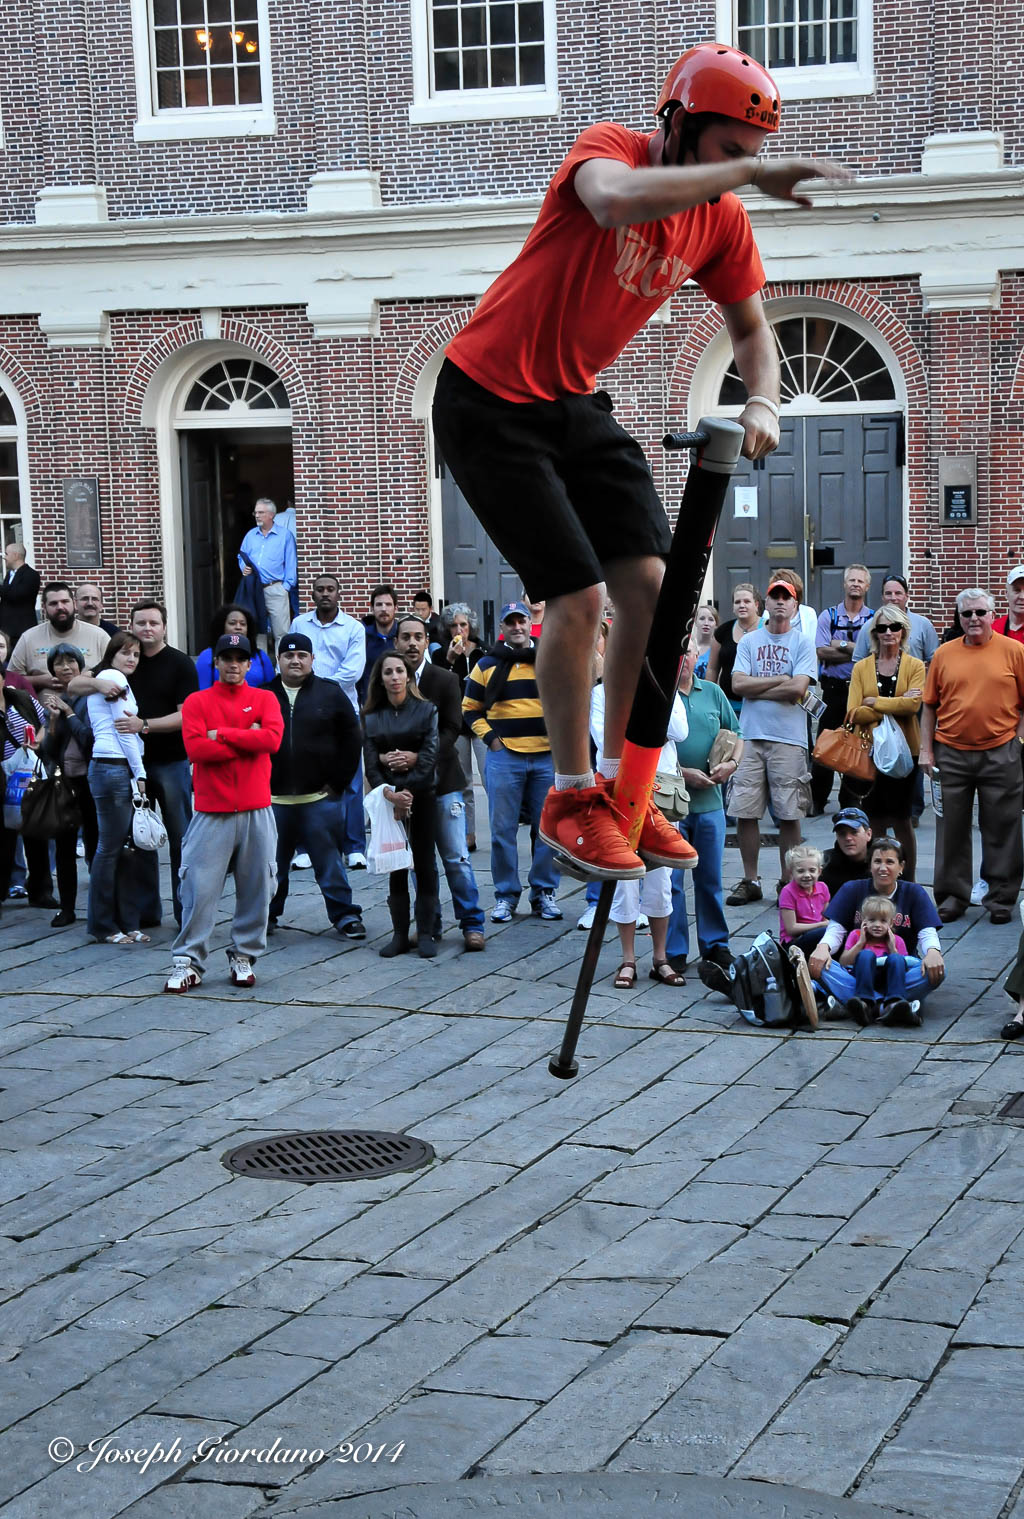
Please note: Today will be the last of the daily posts.  The Visual Chronicle posting schedule will change to three times weekly instead of daily. I will post photos on Tuesdays and Thursdays, and on Fridays the weekly tutorial will continue. I would like to thank all of my followers and viewers that stopped by daily for the past two years and I would love to continue posting every day but truth be told between Monochromia and The Visual Chronicle it is just taking up too much of my time. It’s time to relax a bit after all I am retired :)

This is the fifth installment of the “You Asked For It” series and today I would like to discuss Focal Length And Perspective.  This post is going to be a little easier to understand than the previous two posts so all of you can breath a sigh of relief.

Before I begin I have to make one point which is how focal length applies to sensor size. For those of you with cameras equipped with a full frame sensor you could either skip this paragraph or take a short little nap, your choice. Most people who are either beginners or more advanced photo buffs will have a camera equipped with an APS-C size sensor. Nikon calls this DX format. Being a APS-C size sensor is smaller than a full frame sensor we have to keep in mind there is a focal length multiplication factor whether we are using prime (fixed) or zoom lenses. This multiplication factor is 1.5x which simply means whatever focal length you put on your camera the effective focal length will be 1.5x what is written on the lens. If you were using an 18mm lens the effective focal length will be 27mm (18 x 1.5 = 27). If you were using a 50mm lens the effective focal length will be 75mm (50 x 1.5 = 75). Easy peasy right ?

Focal Length

Now that we have that out of the way I would like to discuss how and why you would need different focal lengths. If you are a casual shooter you probably will never need anything more than the lens that came with your camera which could be 18-55mm, 18-105mm or even 18-135mm. You are probably just going to use the camera for family snapshots or birthday parties. But for those of us who get bitten by the “bug” you will probably be adding some lenses to your camera bag.

If you are shooting with a APS-C sensor here are a few suggestions:

  • 14mm which would be an effective focal length of 21mm (you will absolutely hate a wide angle lens until you learn how to properly use one)
  • 35mm which would be an effective focal length of 52.5mm (this is considered to be a normal field of view similar to what our eyes see)
  • 60mm which would be an effective focal length of 90mm (this could also be a macro lens which doubles as a great portrait lens)
  • 80-200 zoom lens which would be an effective focal length of 120-300mm

Now that I have all of you twitching about all of the money you will have to spend let me explain.  Different focal lengths change not only magnification and field of view but also perspective.  Lets deal with field of view first.

DSLR-focal-length-angle-of-view

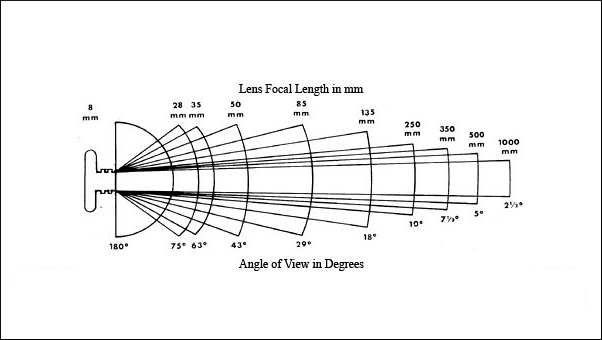
As you can see the above chart describes how focal length relates to field of view.  If we look at the 135mm lens we will see that in addition to having higher magnification than a normal 50mm lens it also has a narrower field of view which is 18 degrees versus 43 degrees on the 50mm.

So what does all this mean Joe ?

It simply means if you need a chisel don’t use a screwdriver :)  In other words there is a reason manufacturers make all these different lenses, so you can choose the correct tool for the job.  If you wanted to take some photos of your recently remodeled kitchen you would not use a 50mm lens, you would use a 14 or an 18mm lens to have a wider field of view this way you can get the whole kitchen in the photo.  A different example would be if you were a bird watcher and you went birding with your friend.  You show up with a 50mm lens and after your friend stops rolling on the ground and laughing he says to you what do you expect to do with that, I’m shooting with a 500mm lens.  You would want a longer focal length for more magnification, you would have to get too close to the birds with a tiny 50mm lens.

Make sense ?  I thought so :)

Perspective

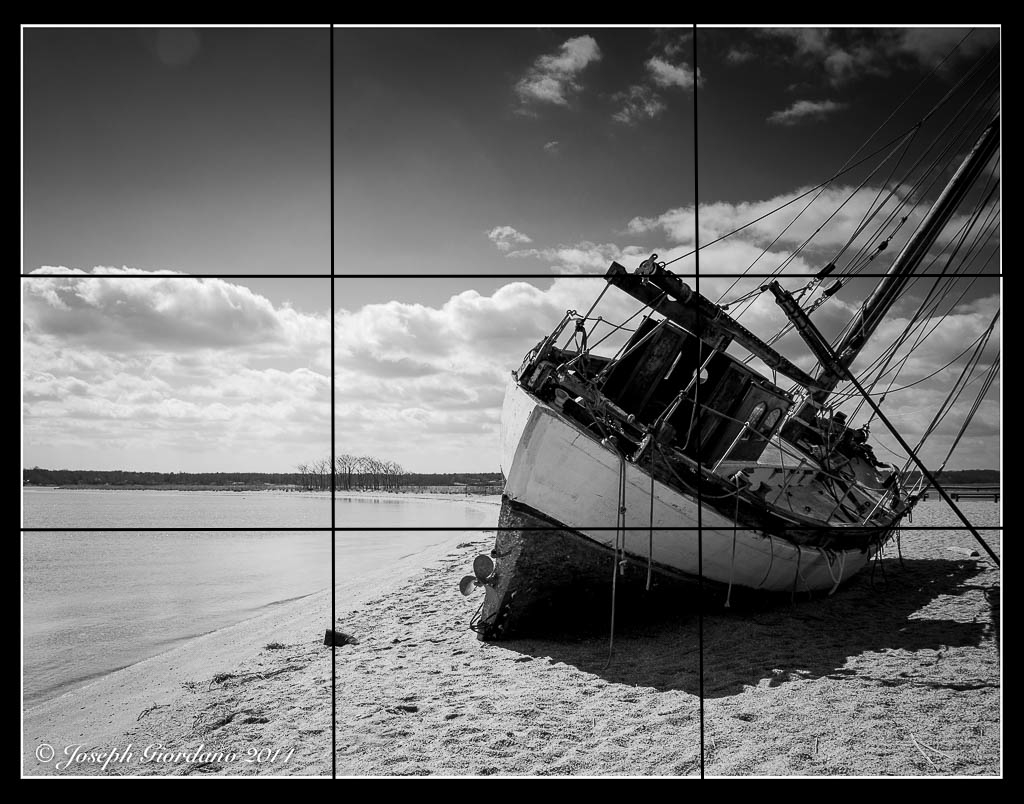
Now I would like to show you how focal length changes perspective.  I will show you three different photos of the same scene taken with different focal lengths.

Example-1

Oh boy Joe a photo of a dog crap bag dispenser, I was wondering when you were going to post one of these, LOL. I really don’t want you to concentrate on the dispenser, but I do want you to notice how the background relates to the dispenser. This photo was taken with an 18mm lens. What effective focal length would that be on my APS-C sensor camera ? Thats correct Laurie 27mm :)  All three of the photos were taken at an aperture of f/11.  Notice on this first photo how the background has depth or separation from the dispenser.  You can see the trees in the distance along with the walkway and a home.  Now lets try the same scene with a 35mm lens below.

Example-2

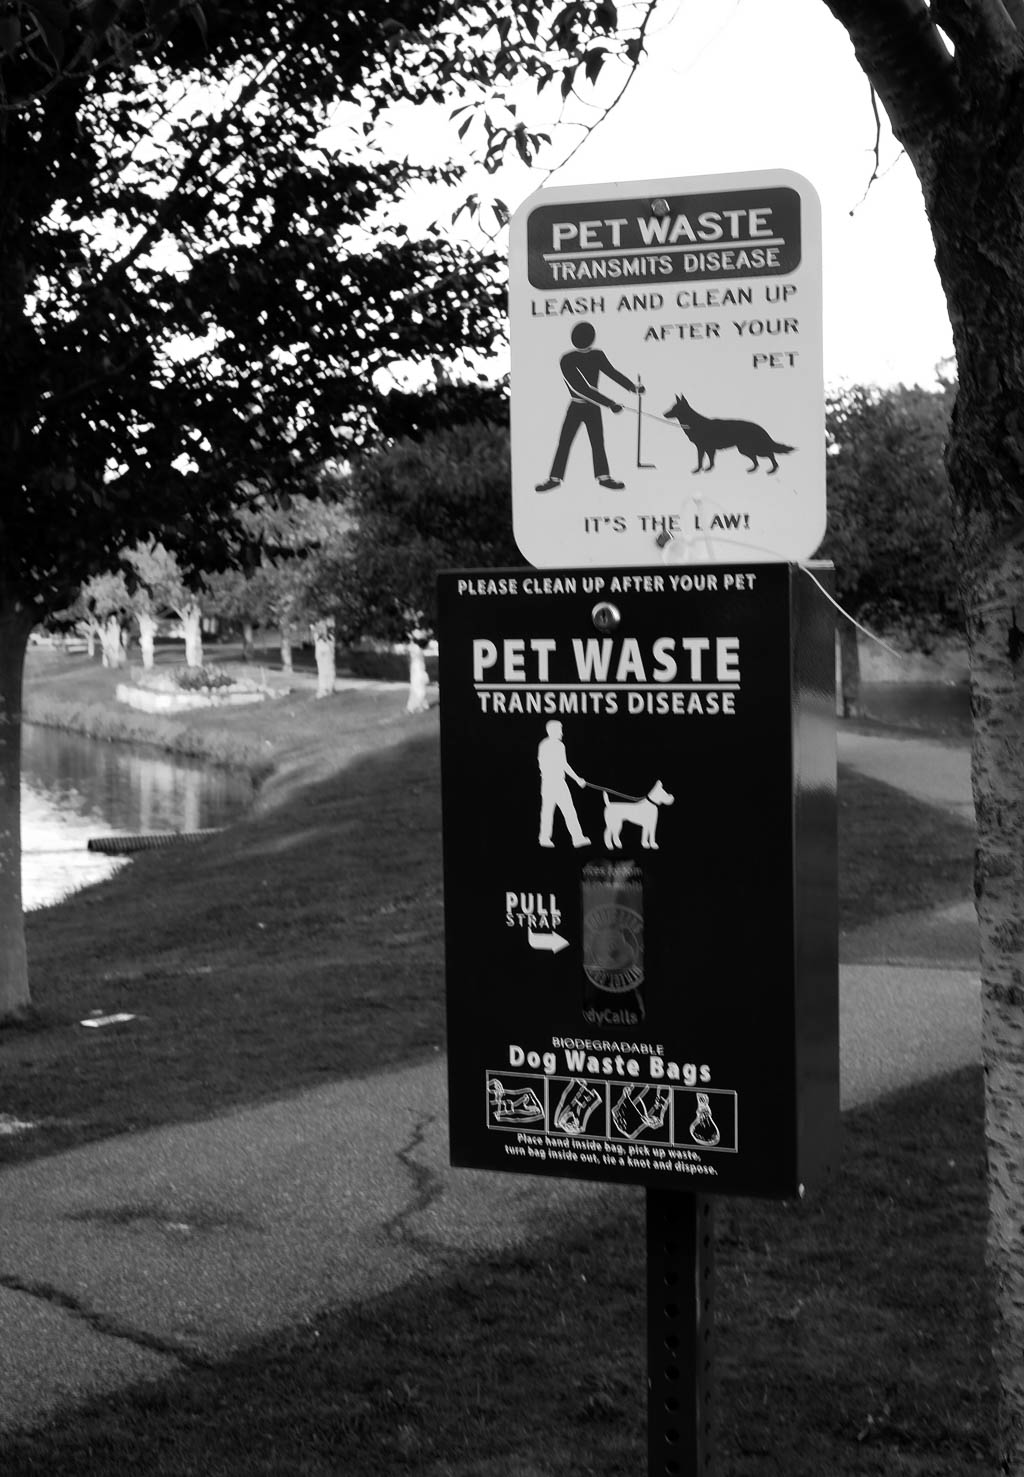
If we don’t pay any attention that I shook the camera a little on this shot you will notice that there is not as much depth to the scene.  This also was taken at f/11 with a 35mm lens which would be what effective focal length on my APS-C sensor camera ?  Thats correct Pauline 52.5mm :)  You can start to see that even though the magnification is higher on the 35mm lens than the 18mm lens the perspective is also changing because of the compression of the background in relation to the dispenser.  Did you notice anything else ?  The field of view got narrower, we see less of the scene than with the 18mm lens. Now lets try the same scene with a 200mm lens below.

Example-3

OK now we can clearly see a huge difference on the perspective on this shot.  Notice how close the tree looks in relation to the dispenser.  The 200mm lens flattened out and compressed the perspective on this shot.  By the way what is the effective focal length of this lens on my APS-C sensor camera ?  Absolutely correct Elina 300mm.  Notice how narrow the field of view got with this lens.

The more you get out and shoot with your camera and experiment with different lenses or zoom lenses the faster you will understand when to use a particular focal length and how you want the perspective to look.

Next week I will discuss why you should shoot (RAW) don’t get upset (or be disappointed) you will still be fully clothed, vs. .jpg 

Standard
Photography

You Asked For It – Exposure And Metering

This is the fourth installment of the “You Asked For It” series of posts and I will try to explain exposure and the different kinds of metering options most modern cameras have. I will also explain hand held light meters and ISO.

Why should I worry about the different metering modes available, my camera seems to do a decent job automatically ?

This is a great question and I’m really glad I asked myself !

The different modes of metering are available because there are situations where the standard default metering will not do an effective job of obtaining correct exposure. I think an explanation of the type of metering is in order before I go any further.

two-meter-types

Reflected Light Metering

Reflected light metering is the method used by all modern cameras today. You point the camera at your subject and your camera measures the light reflecting back to the camera off the subject.  The only problem with this method is when light is reflected back to the camera it does not take into account whether the subject is light or dark in tone.  Sophisticated cameras do their best at compensating for this effect and sometimes they will do a decent job.  Most reflected light meters are calibrated for middle gray or 18% gray.

So why do I need to know this useless information ?

When taking color photos we do not have too many problems with reflected light meters.   Black and white photography is where we might run into problems.   Remember when I told you most reflected light meters are calibrated for 18% or middle gray ?   What do you think will happen if you are taking a black and white photo of a white dinner plate ?   You guessed it the camera will most likely reproduce the image not white but middle gray.   Some metering systems in todays cameras are sophisticated enough to recognize this and will compensate for it, others will not.   Back in the film days  the “Zone” system was created for exactly this reason. The zone system was formulated by Ansel Adams and Fred Archer in the 1930’s.   If you do research on the “Zone” system you will find that 18% gray would equal Zone V (5).   OK enough talk about the Zone system because we are going off on a tangent but there is plenty of information on the internet if you want to learn more about it.  Here is a great article on this subject – Explanation of The Zone System

By the way in case you didn’t realize by now most cameras don’t meter in color.  They have color sensors to record the scene but most of the time the metering sensor  is seeing shades of gray (and I’m not talking about the book ladies)  :)

Incident Light Metering

Incident metering reads the intensity of light falling on the subject, so it provides readings that will create accurate and consistent rendition of the subject’s tonality, color, and contrasts regardless of reflectance, background color, brightness, or subject textures.  Lets read that last sentence again carefully because this is where these metering methods differ.  The first part of the sentence states Incident metering reads the intensity of light falling on the subject.   Notice it does not rely on the light reflected back to the camera.  Why is this so important ?   The next part of the sentence explains this.  It provides readings that will create accurate and consistent renditions of the subjects tonality, color and contrasts regardless of reflectance, background color, brightness, or subject textures.

Whaaaat ?

To use an incident meter you point it in the direction of the camera or towards the camera or by the subject.

But why would I do a stupid thing like that ?

By doing this we can assume that the amount of light falling on the Incident Light meter is the same amount of light that would be falling on the subject.  This method usually works very well for landscape photography and most portrait photographers also use this method.  I happen to use this type of metering when I don’t trust the internal meter on the camera.

I am by no means suggesting that all of you go out and buy Incident light meters because they are superior.  I am just trying to explain the differences and why in certain situations you might have to compensate or adjust exposure from what your in camera meter is suggesting.

In Camera Metering Modes

Most of todays cameras even consumer level DSLR’s have a few different kinds of metering modes available for the user to choose from.  Notice I said modes not types because all internal metering types are reflective type.  I am familiar with Nikon and Fuji but I will use the Nikon terminology.

Matrix Metering or evaluative metering .  This type of metering scheme divides the scene into multiple segments and evaluates each segment for brightness, it then compares these readings to an internal database of possible exposure solutions, then chooses the presumed correct exposure.  The majority of times the exposure is very accurate and this mode of metering should be the default choice for the majority of photos.

Spot Metering is typically used in high contrast situations.   This type of meter concentrates all of its sensitivity on a central spot for precise metering.  For example lets say you attended a concert where the performer is brightly lit but the rest of the stage is dark.  Using Matrix metering would probably result in the wrong exposure because it evaluates multiple areas of the scene and would most likely result in a dark image.   You would use spot metering because you would just want to meter the brightly lit performer to insure he or she was exposed correctly.  Spot metering could also be used for backlit situations where you would be taking a photo of someone with their back to the sun and their face in the shade, you would just meter their face with the central spot.

Center Weighted Metering would be used for scenes that are fairly even in brightness. This type of metering would concentrate most of its sensitivity on the central to bottom portion of the scene, but would not be anywhere near as concentrated as the spot metering mode.  It could also come in handy for sunsets where you would want to create silhouettes of a pier or a boat on the water.  Most film SLR’s used this type of metering years ago.

Please go out and experiment with the different modes of metering on your camera to become familiar with their characteristics.  Put your camera in aperture priority automatic and use the same aperture but take three photos of the same scene (for consistency).  Use Evaluative metering for one shot, Spot metering for the next and Center Weighted metering for the final shot.  When you upload your images to the computer see if you can tell the difference between the three images and why each one is different.

You don’t waste time by experimenting you gain a better idea of what is happening and why.   We are talking digital so there is no need to think you are wasting film.

Sensitivity

I think an explanation of sensitivity is in order by now (don’t worry guys I’m not going to get all emotional on you now).  Sensitivity is expressed in ISO and it is adjustable on all cameras.  Years ago in the film days this sensitivity was expressed in ASA and in later years ISO.  The lower the sensitivity on the film was, the less reactive to light it was.  Kodak made a film named Panatomic-X and this film had a ASA of 25.  They also made a named Plus-X which was 100 ASA (this film was 4 times as sensitive to light as the Panatomic-X was).  Kodak also made a film named Tri-X which was 400 ASA (or again 4 times as sensitive to light as Plus-X).  As the speed of the film increased so did the size film grain.

Let me explain, if you wanted to go out and take photos at the beach or a bright sunny day you would probably use the Panatomic-X at 25 ASA.  You would not need the higher film speed because you had ample light.  If you were going to a concert or a stage performance you would want a film such as Tri-X that was more sensitive to light because of the more dimly lit situation.

ISO works the same as ASA worked on film cameras.  The lower the ISO is set the less sensitive your camera’s digital sensor is to light and of course the higher the ISO the more sensitive to light.  Being we are not using film we don’t have to worry about film grain when we increase the ISO.  We do have to worry about digital noise though which is similar to film grain.  The higher you set the ISO the noiser the image will be.

But Joe even if I put my ear really close to the camera I still don’t hear any noise ?

Digital noise is nothing you can hear but you can easily see it in your images, they are less sharp and the colors are muted.  If you use your camera in Program Automatic mode the ISO will most likely be set automatically to something higher than you should be using.  The best thing you can do is set your camera to the lowest ISO or (default ISO which is most likely 100 or 200 ISO) and leave it there.  Some cameras have very good high ISO performance but they are the higher end models and not the starter or beginner cameras.  Take your cameras out of Program mode and go through your menus and turn off auto ISO unless you have a high end model.  If you want to see how high ISO can degrade the image quality do the following experiment.  Set your camera to ISO 200 and go outside and take a photo of an object in the shade.  Then change your ISO to 6400 or the highest it will go and take the same photo of the object in the shade.  Compare the two on a computer and let me know which photo you like better.

I know this installment of the lessons is not as easy to understand as the previous three posts. This is why I saved it until today, so I could lure you into being interested in these posts, Moo Ha Ha !   It was not intended to teach you how you should take photos but more to inform you why your camera has different metering modes and when you should use them.    If you have any questions please contact me and I will answer to the best of my ability.

Standard
Photography

You Asked For It – Shutter Speed

This is the third installment of the “You Asked For It” series and we will discuss Shutter Speed today. Shutter speed is one method which controls the amount of light that reaches the film or digital sensor.

Oh no, their’s more than one method ?

Yup ! Last week we discussed aperture or lens opening which is the other way we control the amount of light reaching the film or digital sensor.

OK, now you’re full of it Joe, you wrote a whole damn article on depth of field and you had me believing that ?

Aperture does control depth of field, but it also is another way to control the amount light that reaches the film or digital sensor.

Remember last week when I told you I didn’t want you to worry about how aperture is related to shutter speed and formulas ?

Guess what, I lied :)

We have to understand the relationship between aperture and shutter speed to be able to control light in manual mode.

SeeSaw

The above chart will show in graphic form how aperture and shutter speed are linked.   You will see as the aperture is increased (lower number) shutter speed must increase.  Think of this graphic as a child’s SeeSaw with the pivot point in the middle indicating the perfect exposure and it will become clear how aperture and shutter speed are linked.

Why is this ?

When we increase the aperture or open the lens (lower number) we are letting more light into the camera.  By doing this we have to also increase the shutter speed so the shutter stays open for a shorter time or else we would overexpose the image.  If we were to use the opposite example by closing the aperture (higher number) we  are letting less light into the camera so the shutter speed must be decreased so the shutter speed would stay open for a longer period of time to compensate for the lower light.

To prove the above chart is accurate i would like you to take your camera and put it into Aperture Priority mode (remember when we are in aperture priority mode we are controlling the aperture and the camera is selecting the shutter speed).  Point the camera towards a brightly illuminated window or go outside if you prefer and change the aperture from its lowest number to the highest number.   I want you to take notice to how the shutter speed is reacting as you change the aperture.  Open the aperture and the shutter speed gets higher, close the aperture the shutter speed gets lower.

OK Joe but I thought this lesson was about shutter speed, and I’m still playing around with the aperture ?

Good point, now lets put the camera into Shutter Priority mode.

Can anyone tell me what happens when we put the camera into this mode ?  A show of hands please !

Yes you in the back with your hand raised really high Pauline, you are absolutely correct we are choosing the shutter speed and the camera is automatically selecting the corresponding aperture to achieve the correct exposure.

Why on earth do I need to know this ?

Lets say you wanted to take a photo of a fast moving object such as a train or an automobile. You really would not be too concerned with depth of field you would be more concerned with how to capture this object so it is clear.  To do this you would have to freeze motion.

How do we freeze motion and am I going to be cold during this lesson ?

I am talking about freezing motion by using a higher shutter speed not by temperature :)   By choosing a higher shutter speed (higher number) we are keeping the shutter open for a shorter period of time.

Whaaat ?

If you notice shutter speeds are expressed in fraction form 1/8000, 1/4000, 1/2000,1/1000, 1/500, 1/250, 1/125 and so on.

Do you notice a pattern with these numbers ?

Very good Elina, they all look like they are exactly half of each other.  For example 1/1000th of a second is half of 1/500th of a second.  We can also state this as 1/1000th of a second will let exactly half the amount of light into the camera as 1/500th of a second, or expressed in photography terms 1 stop faster.  If we reversed this 1/500th of a second will let exactly twice the amount of light into the camera as 1/1000th of a second or 1 stop slower.

You might have noticed in the previous lesson on Depth Of Field the lens opening or aperture is expressed in numbers also.  Lets show that chart again.

camera-aperture

Do you notice any similarities with the numbers on this chart ?  f/4 looks like it’s letting half the light into the camera as f/2.8, and f/5.6 looks like its letting half the light into the camera as f/4. These are called f stops and f/4 is one stop slower than f/2.8 or we could also say that f/4 is letting exactly half the light into the camera as f/2.8.  As we look at the chart we will see that as we close the aperture or increase the number (higher) each f stop or f number lets in exactly half the light as the previous f stop.

OK so now that we know the camera aperture and shutter speeds are calibrated in stops we could make sense of why aperture and shutter speed are linked.

Lets say we point the camera at an any object and the meter on the camera is reading 1/125th of a second at f/8 for proper exposure.  Now lets say that object is a person and we want to isolate this person from the background by using shallow depth of field.  Well the camera is reading  f/8 so I am not going to be able to isolate the background with that aperture so I want to open the aperture to f/2.8 to get the pleasing background.  I cannot just change the aperture and expect not to compensate with the shutter speed and still achieve proper exposure so lets count backwards.  As I change from f/8 to f/5.6 (one stop increase) I am letting twice the amount of light into the camera so I would have to increase the shutter speed by one stop from 1/125th of a second to 1/250th of a second (one stop decrease).

Why are you saying decrease when the shutter speed is getting higher ?

Because as we increase the shutter speed from 1/125 to 1/250 we are letting half the light into the camera to compensate for the increase of twice the light by opening up the aperture from f/8 to f/5.6.  Starting to make sense ?

Lets continue to count backwards because I want to open the aperture to f/2.8 to photograph this person.   Now lets open the lens to f/4 or 1 more stop so once again we are letting twice the amount of light in so we have to increase the shutter speed to 1/500th to compensate or 1 stop less.  Lets continue and change the aperture to f/2.8 or 1 stop more and once again we are letting twice the amount of light into the camera so we compensate by increasing the shutter speed to 1/1000th one stop less.   We now have the aperture where we want to have a pleasing background and we are still getting correct exposure.  In other words 1/125th @ f/8 is the same exposure as 1/1000th @ f/2.8 all we did was adjust the camera from its suggested exposure to properly fit the situation of taking a photo of someone where we wanted to have a pleasing out of focus background.  I showed you an example of a camera in manual mode, if your camera was in aperture priority mode the shutter speed would change automatically as you changed the aperture.

Shutter Speed

First I am going to show you the difference between a photo taken with a slow shutter speed and then I will show you one taken at a faster speed. The photo on the top was taken with a shutter speed of 1/13th of a second. This was done intentionally to convey speed or motion. This technique is known as motion blur and even though the bicyclists and car are really not moving that fast using a slow shutter speed exaggerates their motion.

OLYMPUS DIGITAL CAMERA

This performer was in the Quincy Market Square in Boston and was using a giant Pogo stick. He was about 5 to 6 feet in mid-air as the interested crowd looks on.  Notice how using a shutter speed of only 1/200th of a second almost totally froze him in mid-air.  If I would have had the light to increase the shutter speed to lets say 1/500th of a second this photo would have been totally sharp. This is known as freezing motion.

Stunt


As you become more familiar with aperture and shutter speed and practice using different settings you will begin to understand why some of you photos are turning out great and why some not so great.  When you understand these concepts you will be able to identify settings or mistakes you might of relied on the camera to take care of before and correct them on the spot so you don’t miss the shot.  I know this lesson was a little more difficult than the previous ones but as we progress the lessons will get more complex.  I am trying to make these lessons as easy to understand as I can but if you do not understand something please email me through the contact me page.

Next Friday – Metering and Exposure

Standard
Black and White, Black and White Photography, Joseph, New York, Photography

You Asked For It – Composition

Composition

I had recently been asked to participate in a post called “Blog hop around the world”.   In this post I had to answer four questions about my craft or passion which is photography.  I was totally blown away with the comments and positive response I had received for this post and surprised how many people were encouraging me to write more.  I have never really been one to write much with my posts but rather to post photographs with brief descriptions.  People actually were interested in what was going on inside my head while I was taking photos (which is a very scary thought in itself).

So here is the first post in a series of called “You Asked For It”.  The inner workings of an old retired guys mind who happens to love the art of photography :)

We will start the series off with the subject of – Composition.  Why are we starting off with composition ?  Because thats what I feel like talking about today (you asked me to write, but I never said I would be a good teacher, LOL).  Actually most cameras today have advanced metering systems and lots of automatic features so achieving proper exposure with them is usually pretty easy.

What are the building blocks or elements that make a good photograph ?

1.  Proper exposure – This is a given, proper exposure is essential for a good photograph.  Lets admit it we have all seen a photograph from a friend or relative that is so badly exposed you can hardly recognize the subject matter.

2.  Subject matter – This is kind of subjective because whats interesting to one person might be pretty boring to someone else. Lets all agree for the moment that we are talking about subject matter thats interesting to everyone.

3.  Composition – This one is a biggie in my opinion, you might be able to get away with poor composition but then I would call it a snapshot not a photograph. Composition is what makes your image appealing.  Have you ever seen an image that you just can’t stop looking at ?   The reason most likely is the photographer nailed all three of the above elements.

The Rule Of Thirds

How many of you have heard of “The rule of thirds” ?  Lets see a show of hands.  Okay you can put your hands down now I can’t see them anyway.

The rule of thirds states you should divide your scene into thirds in both the horizontal and vertical planes so the easiest way to do this is with gridlines. Most modern DSLR’s have a feature that can be turned on via the menu system called gridlines. My Nikon D610, Fujifilm X-T1 and Fujifilm X-E2 all have this feature. If your camera does not have this feature you will just have to imagine a blank Tic-Tac-Toe board or a total of nine squares.

Shipwrecked-Grid

The above photo is typically what I see through my viewfinder when the gridlines are turned on.  I usually leave the gridlines on all the time so I am not fumbling through the menus when I want to grab a shot.  The whole premise of the rule of thirds is to place one of the points of interest in your photo where any one or more of the lines of the grid intersect each other.   Before you ask you will not get extra points if you intersect all four locations, thats not the objective here. As you can see in the above example the hull of the ship is intersecting the bottom horizontal line and the vertical line to the right.  You can also see that the top horizontal line and the vertical line to the right is almost intersecting where one of the masts is placed.  What would make this image perfect composition would be if the horizon was a little lower so it would intersect the bottom horizontal line and the left vertical line.  After looking at the photo I decided to raise the horizon to its present place in the cropping process because I liked the way it looked better.   The rule of thirds should be used as a guideline for composition.   It is not cast in stone where you have to use it every time but in the majority of cases when used will make for better composition in your images.

Shipwrecked

Here is the same image with the gridlines removed.  I also used a wide angle 24mm lens on a full frame sensor camera to accentuate the ship a little more (I was a lot closer to this ship than you would think from the photo).

I hope I have explained this subject so most of you will walk away with an “AhHa” moment but if I was not clear please contact me through the “Contact Me” menu on the home page of this blog and explain to me which part is not clear and I will contact you through email to try and answer your questions.

Next Friday’s topic – Depth of field

Standard