In this post I would like to discuss Macro photography so a brief explanation is in order to explain what exactly “Macro” is. Macro photography is different than close up photography. I am sure most of you have seen the do it all lenses advertised and some of you might even own one. You know the lenses I am talking about – 24-105mm with macro or 80-200mm with macro. Well here is a little news flash, these are multi-purpose zoom lenses with a close focusing function. They are not Macro lenses. True macro lenses are fixed focal lengths 60mm, 90mm, 105mm, 180mm, 200mm and so on. True Macro lenses (or as Nikon labels them Micro) have the ability to reproduce subjects at a 1:1 ratio.
Oh crap Joe you’re not going to start with this math again !
No don’t worry what I mean by 1:1 ratio is that Macro lenses can reproduce something life-size, if it is 1 inch square it will reproduce a life-size 1 inch square on your image with no cropping or enlargement. This is called reproduction ratio and it is listed in the specifications on all Macro lenses. If you look in the specifications on the multi purpose lenses with so called “Macro” mode you will most likely see something like 1:2, 1:4 or even 1:5 and that is why these lenses should be marketed as multi purpose zooms with close up function, not macro.
I have been using a Tamron 90mm macro lens (Nikon mount) for about a year now but if I had money to burn I would buy a macro lens in the 180mm to 200mm focal length. I happened to run across this Tamron 90mm for a great price used so I purchased it. The lens is shown below and happens to be spectacularly sharp, as all macro lenses should be.

But Joe if you already have a macro lens why would you buy a longer focal length macro lens ?
There is a simple reason, to increase my working distance from the subject. I use a full frame sensor camera so the 90mm Tamron is actually 90mm. Remember way back when we were discussing depth of field and sensor size when I explained if you use anything except a full frame sensor there is a focal length multiplication factor ? Well lets say I was using an APS-C sensor camera like the Nikon D7000. Then my Tamron 90mm would actually work out to be a 135mm (90mm x 1.5 = 135).
The closer you are to your subject the more likely it is that you are going to block the light or at least shade the light. With a longer lens you have a greater working distance and you don’t run into the problem above. The working distance on the Tamron I am using is about 3.5 inches at 1:1 reproduction. If I was using a 200mm macro lens the working distance might increase to as much as 11 inches. You also have a greater chance of not disturbing insects or butterflies on flowers if you are further away from them (not to mention getting stung by a bee).
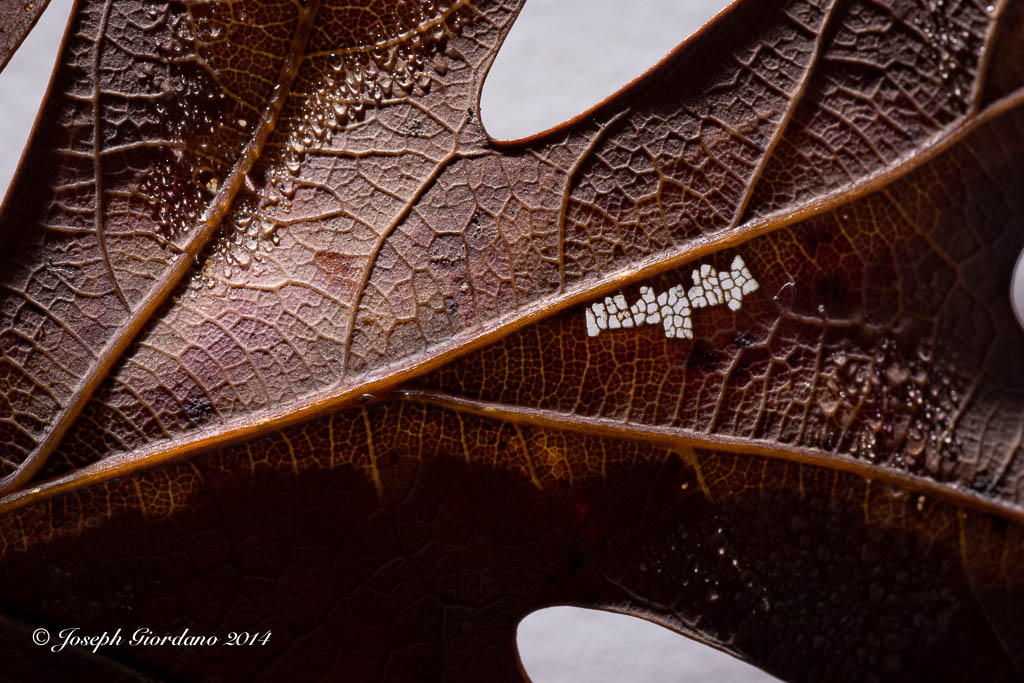
So lets see a few examples. Today was a little chilly outside so I gathered up some leaves and brought them into the house. In the first example I will just show you a natural light image straight out of the camera.

This image is a 1:1 reproduction which means the leaf was the same exact size as in the image. This image was taken at an aperture of f/32 and you would expect the depth of field to be very deep or sharp. If you look at the photo closely you will see that the veins of the oak leaf are in sharp focus but the water droplets are really not tack sharp. This particular lens goes down to f/64 but it really would not make too much difference if I used that aperture because when working with macro lenses there is no such thing as great depth of field. The difference in height between the veins and these water droplets cannot be more than 1/128 of an inch yet at f/32 the depth of field is still shallow.
Okay so lets get back to the lesson, I really don’t like the flat natural light on this image so lets try some flash in the next image.

This is a little better but the lighting is still flat because the flash was shot from a head on position (you all know me by now I’m a texture freak). Lets try a little side lighting to bring out the texture of this subject.

Do you see how much of an effect lighting can produce. On this photo the Flash was placed at the 9:00 position just to the left of the image. Lets try another light placement.
This image was taken with the flash at the 12:00 position and it also provided a little backlighting as evidenced by the white area in the middle right where the white background is showing through the leaf. Although all of these images are very different they were all taken at the same aperture f/32. It is the lighting that is making them look different. I finally settled on the image below.
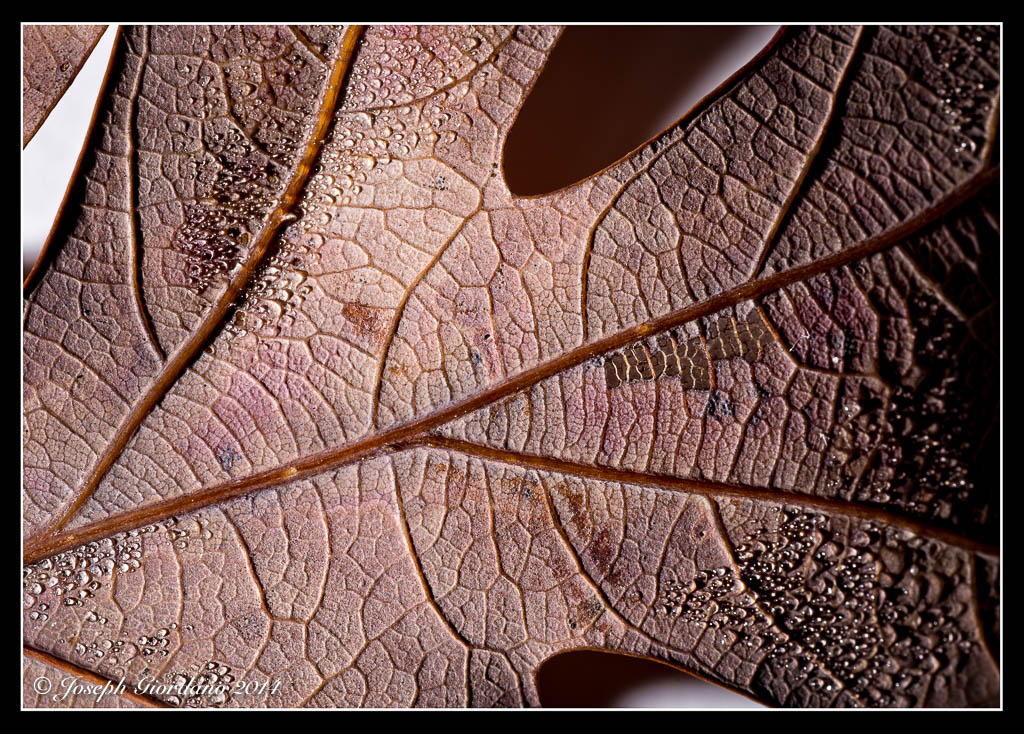
This image to my eyes was the closest to the original with only a boost in the texture which was achieved by the flash in the 7:00 position and being hand held slightly elevated.
Now some of you are probably asking yourselves why didn’t he just use the on camera flash. The reason I used an external flash is because if I used the on camera flash I would have introduced a shadow from the macro lens into the image because of the close proximity of the on camera flash and lens. I used a Nikon SB-700 Speedlight in wireless mode.
I suppose after telling you I used the SB-700 Speedlight in wireless mode I should explain. Most of the Nikon Speedlights have a mode called “Remote” and most of the Nikon cameras except for the less expensive ones have a mode called “Commander” mode. The Nikon D70, D70s, D80, D90, D200, D300, D7000, D700, D600, D610 and D800/D810 all have commander mode available in the camera. This simply means you can set your camera to control external Nikon Speedlights wirelessly with full TTL control “Through The Lens” exposure control. I’m sure Canon and other manufacturers have the same thing but you will have to check your instruction manuals to see what they call it.
Nikon also calls their system “Creative Lighting System” and here is where you find it in your menu system. I am using a Nikon D610 as an example but the menus are very similar in the cameras mentioned above.
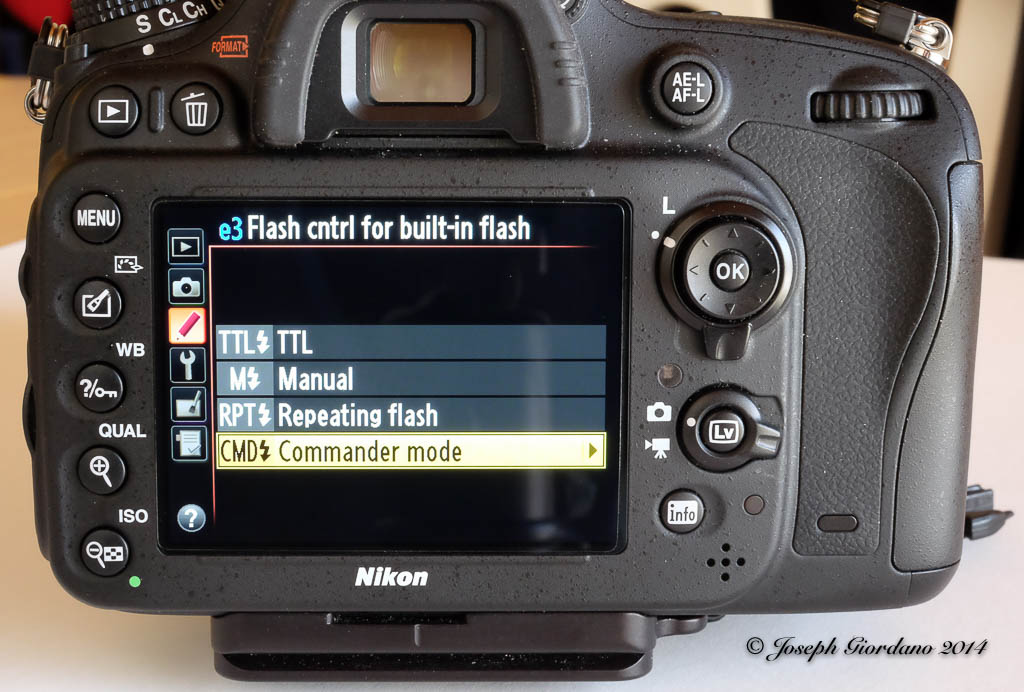
The first menu will be shown in the Custom setting menu and it will be listed under Bracketing/flash select this.

The next menu will be Flash control for built in flash. The default setting is TTL, you will have to change it to Commander mode.
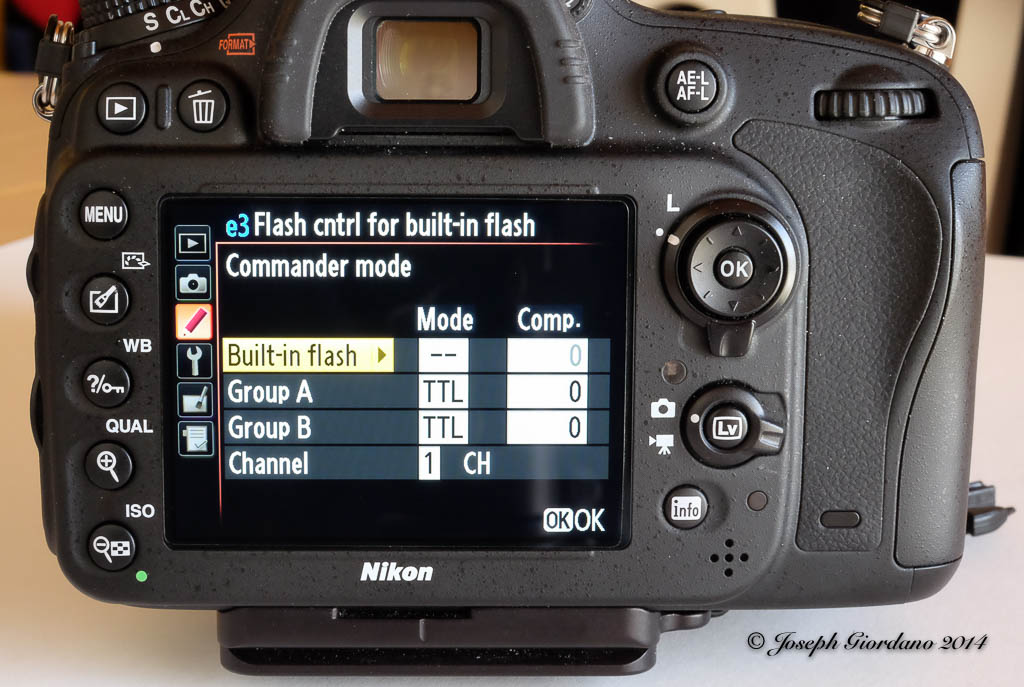
The next menu is a sub-menu of Flash control for built in flash and notice I turned the built in flash OFF as indicated by the two dashes. Being I only used one external Speedlight I am only concerned with Group A which I set to TTL with No exposure compensation and Channel 1 (yes with the Nikon CLS system you can control the output of you external Speedights from the camera position without touching your Speedlights). Also notice that you can set multiple groups of Speedlights if you desire to do a multiple light setup for portraits and the wireless function really comes in handy (if you have ever tripped over a wire and destroyed a Speedlight you will understand).
The only step left to do is set your external Speedlight to Remote and be sure to pop the built in flash on your camera up. Also make sure your external flash is set to channel 1. The built in flash will communicate with the external flash through infrared signals. It will not fire it will only control the remote.

A word to the wise is after you are done with your remote lighting session switch your menu settings back to their defaults. Your pop up flash will not fire until you do.
I hope those of you with macro lenses or about to purchase a macro lens will find this post handy and also anyone who owns one of the Nikon cameras listed above will experiment with remote wireless flash. It is simple to set up and can really improve your photos by moving the flash off camera. Hmmm maybe that should be a separate post, LOL.