What exactly is ISO ?
Back in the days of film it was called ASA and the lower the number was, the less sensitive to light the emulsion of the film would be. For example Kodachrome 25 was a popular slide film and as the number in it’s name would indicate the ASA was 25. Kodachrome was a great all purpose slide film for landscapes and general purpose photography, but it was not something you would want to use for a sporting event where you would want to capture action. Another popular film that I loved using was Kodak Tri-X which was rated at 400 ASA. This was a great black and white film that you would use for dimly lit stage shows or concerts. You would also be able to “push” process this film where you would shoot the film at 800 ASA or higher in your camera and manipulate the processing time and temperature of the chemicals. When this film was “push” processed you would see a increase in the grain of the film where it would give the printed photo a coarse look or a more gritty kind of look.
That was then and this is now, but we have still have some similarities when talking about ISO. When using digital camera at is default base ISO (normally in the 100 to 200 range) your image quality will be at its best, then it will slowly degrade as you raise the ISO. Modern digital cameras are much better at higher ISO settings than cameras produced just a few years ago. I remember when I owned a Nikon D2X camera it produced some of the most wonderful images at its base ISO, but raising the ISO to 800 would degrade the image quality greatly. The D2X was a very expensive professional camera but when Nikon introduced the D300 it blew the D2X away when it came to higher ISO performance at about 1/3 the price. Then Nikon introduced the D7000 about 2 years later and blew the D300 away with high ISO performance at about 2/3rd of the price. As digital technology has evolved high ISO performance has also improved greatly.
I no longer use Nikons as most of you already know, I now use Fujifilm X cameras which are well known for their high ISO performance. I am not discouraging people from using Nikon or any other brand of camera, I am still very fond of the Nikon products I once used but for me I find the “user experience” combined with the high ISO performance of the X-T1’s I am using now to be a much better value for my money. I am not saying Nikon does not have great high ISO performance so please don’t send comments stating the Nikons you own have great high ISO performance, I already know this. I am merely saying in my opinion when you factor cost into the equation I think the Fuji’s give you more bang for the buck.
I guess I should take a moment to explain “user experience” a little more so people don’t think I am a more “flaky” than I already am. I learned photography on film cameras which had shutter speed dials on the top of the camera and aperture rings on the lenses not command dials. I tend to favor separate dials for ISO, shutter speed and aperture rings because they feel like they are second nature to me. There is nothing wrong with command dials on other brands of cameras (the Fuji X-T1 also has front command dials but I elect not to use them). This is merely a case of “to each their own”.
The grain in faster film could be compared to the color noise or artifacts produced by a sensor in a digital camera operating above its base ISO. In the following photographs I will try to show you the differences in images shot at higher ISO’s.
All images were shot with a Fuji X-T1 and XF 60mm f/2.4 R Macro lens set to f/4.0 and camera mounted to a tripod. The only variable is shutter speed which changed as the ISO increased. All images are unmodified jpeg files.
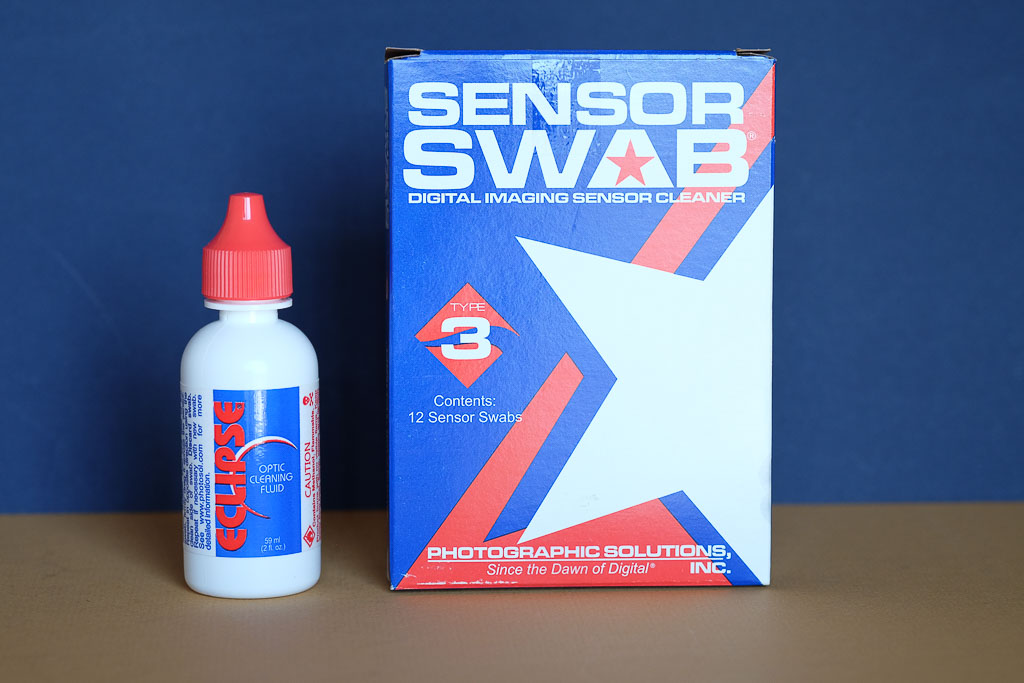
Here is the first image shot at ISO 200

Nothing out of the ordinary in this image as expected. White balance is good and colors are accurate. ISO 200 is default for the X-T1
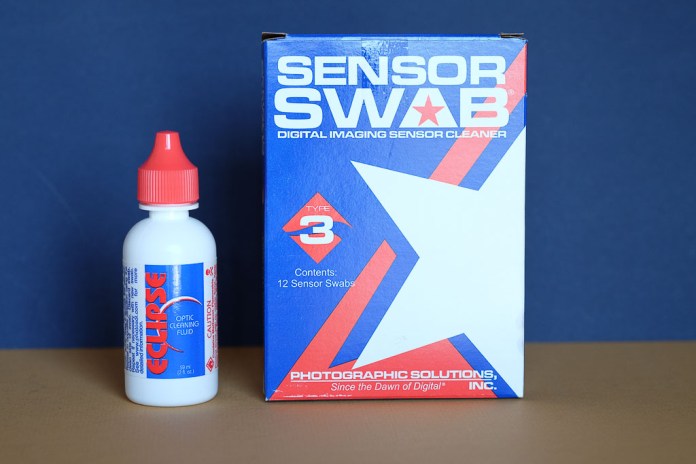
This image was shot at ISO 400

Still great performance at this ISO
This image was shot at 800 ISO
Still great performance at this ISO nothing that cannot be adjusted in Lightroom.
This image was shot at 1600 ISO

Still damn good performance at this ISO but we start to see less saturated colors. Still can be adjusted easy in Lightroom.
This image was shot at 3200 ISO

Still very good performance but in addition to colors being less saturated the small text appears to be less sharp.
This image was shot at 6400 ISO

Still a pretty good performance but now we start to see some grain or a little color noise affecting sharpness.
This image was shot at 12800 ISO

This is still respectable performance but the sharpness is definilty being affected as evidenced by the small text and the mark to the left of the Eclipse sensor cleaning fluid on the blue background.
This image was shot at 25600 ISO

This is still not a bad image if you really needed this ISO to grab the shot but sharpness and noise is really starting to take its toll.
Now I probably shot myself in the foot by using a camera with the high ISO performance such as the X-T1 but I hope you will see the difference. My original intent was to shoot this series of images with the Sony RX100 but as usual I waited until the last minute to write this post and someone bought my RX100 and the replacement Fuji X30 did not arrive yet.
I would suggest for all who are reading to run this same test with your own cameras. Set your camera to aperture priority, pick an aperture and start at your cameras default ISO. With each image double your ISO and see how far you can go before your images are unacceptable when viewed on a computer screen. Remember to use available light and a tripod. Testing the ISO performance of you camera can go a long way in telling you its limitations and if you do use the auto ISO feature on your camera you will know the maximum you should set it to for acceptable image quality.
Thanks for sticking with me and reading my post.